
To resize a volume on DigitalOcean, follow these steps: access the Droplets section in the DigitalOcean control panel, select the Droplet associated with the volume, click on “More” and then “Resize Volume,” choose the desired size, and confirm the resize. This process allows you to adjust the storage capacity of your DigitalOcean volume.
Resizing a volume on DigitalOcean is a straightforward process that enables users to modify the storage capacity of their volumes. By following a few simple steps in the DigitalOcean control panel, users can effortlessly resize their volumes to meet their changing needs.
Whether you require more storage space or want to reduce the size of your volume, DigitalOcean provides a user-friendly interface to easily manage and adjust the volume size accordingly. In this blog post, we will guide you through the process of resizing a volume on DigitalOcean, ensuring that you can efficiently scale your storage resources to suit your requirements.
Credit: docs.digitalocean.com
Introduction To Volume Resizing
Learn how to easily resize volumes on DigitalOcean to adjust storage capacity for your projects. Follow simple steps to increase or decrease volume sizes hassle-free.
Volume resizing is crucial for managing storage efficiently. It allows for adjusting storage capacity without data loss.Why Resizing Matters
- Ensures adequate storage for data growth.
- Improves performance by allocating resources effectively.
- Enhances flexibility for scaling applications.
Prerequisites For Volume Modification
- Access to DigitalOcean account.
- Existing volume to resize.
- Understanding of volume resizing process.
Initial Steps Before Resizing
Prepare for resizing a volume on DigitalOcean by backing up important data, ensuring adequate free space, and understanding the potential impact on your system. Verify all prerequisites are met before initiating the resizing process to avoid any data loss or system disruptions.
Backing Up Data
Before resizing your volume on DigitalOcean, it’s crucial to back up your data. This step ensures that you don’t lose any important data during the resizing process. You can back up your data by copying it to an external hard drive or cloud storage service like Google Drive or Dropbox. It’s essential to confirm that your backup is complete and error-free before proceeding with the resizing process.Verifying Current Volume Usage
The next step before resizing your DigitalOcean volume is to verify your current volume usage. It’s essential to ensure that your current usage doesn’t exceed the new volume size you want to create. You can check your current disk usage by using the command “df -h” in your terminal. This command will display the disk usage of your DigitalOcean droplet and help you to determine the new size you want to create. Once you have backed up your data and verified your current volume usage, you can proceed to resize your DigitalOcean volume. Resizing your volume will provide you with more storage space, which is especially useful if you have a growing website or application. With these initial steps, you can resize your volume on DigitalOcean without losing your valuable data.Choosing The Right Size For Your Needs
Resizing your volume on DigitalOcean is a crucial step in optimizing your cloud infrastructure. When it comes to choosing the right size for your needs, it’s essential to consider various factors such as storage requirements and cost considerations. Let’s delve into these aspects to help you make an informed decision.
Assessing Storage Requirements
Before resizing your volume, it’s important to assess your storage requirements. Start by evaluating the current storage usage and projecting future needs. Consider the amount of data your applications generate and the growth rate. It’s also crucial to analyze the types of data being stored, whether it’s static files, databases, or application logs. This assessment will guide you in determining the optimal volume size to accommodate your storage needs.
Cost Considerations
Cost is a significant factor when resizing your volume. Take into account the pricing structure for different volume sizes and the potential impact on your overall cloud infrastructure costs. Calculate the cost implications of increasing or decreasing the volume size and assess the cost-effectiveness of different options. It’s important to strike a balance between meeting your storage requirements and optimizing costs to ensure efficient resource utilization.
Resizing Volume Via Digitalocean Control Panel
Easily resize your DigitalOcean volume via the control panel. With a few simple clicks, you can adjust the size to meet your changing storage needs without any hassle. This seamless process ensures smooth scalability for your projects.
Navigating The Interface
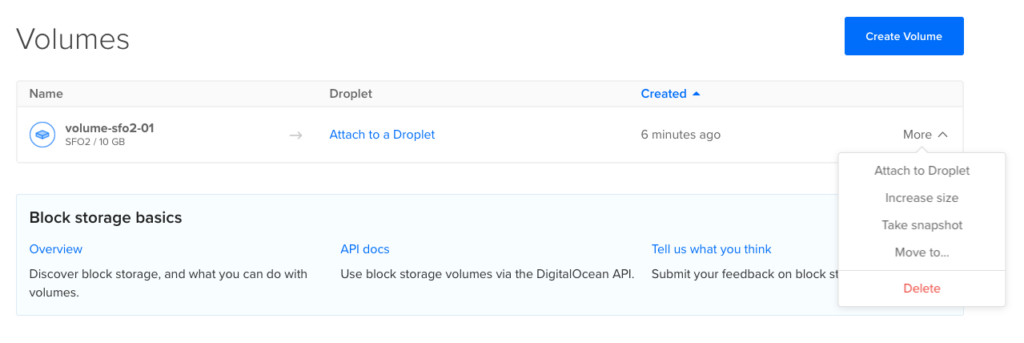
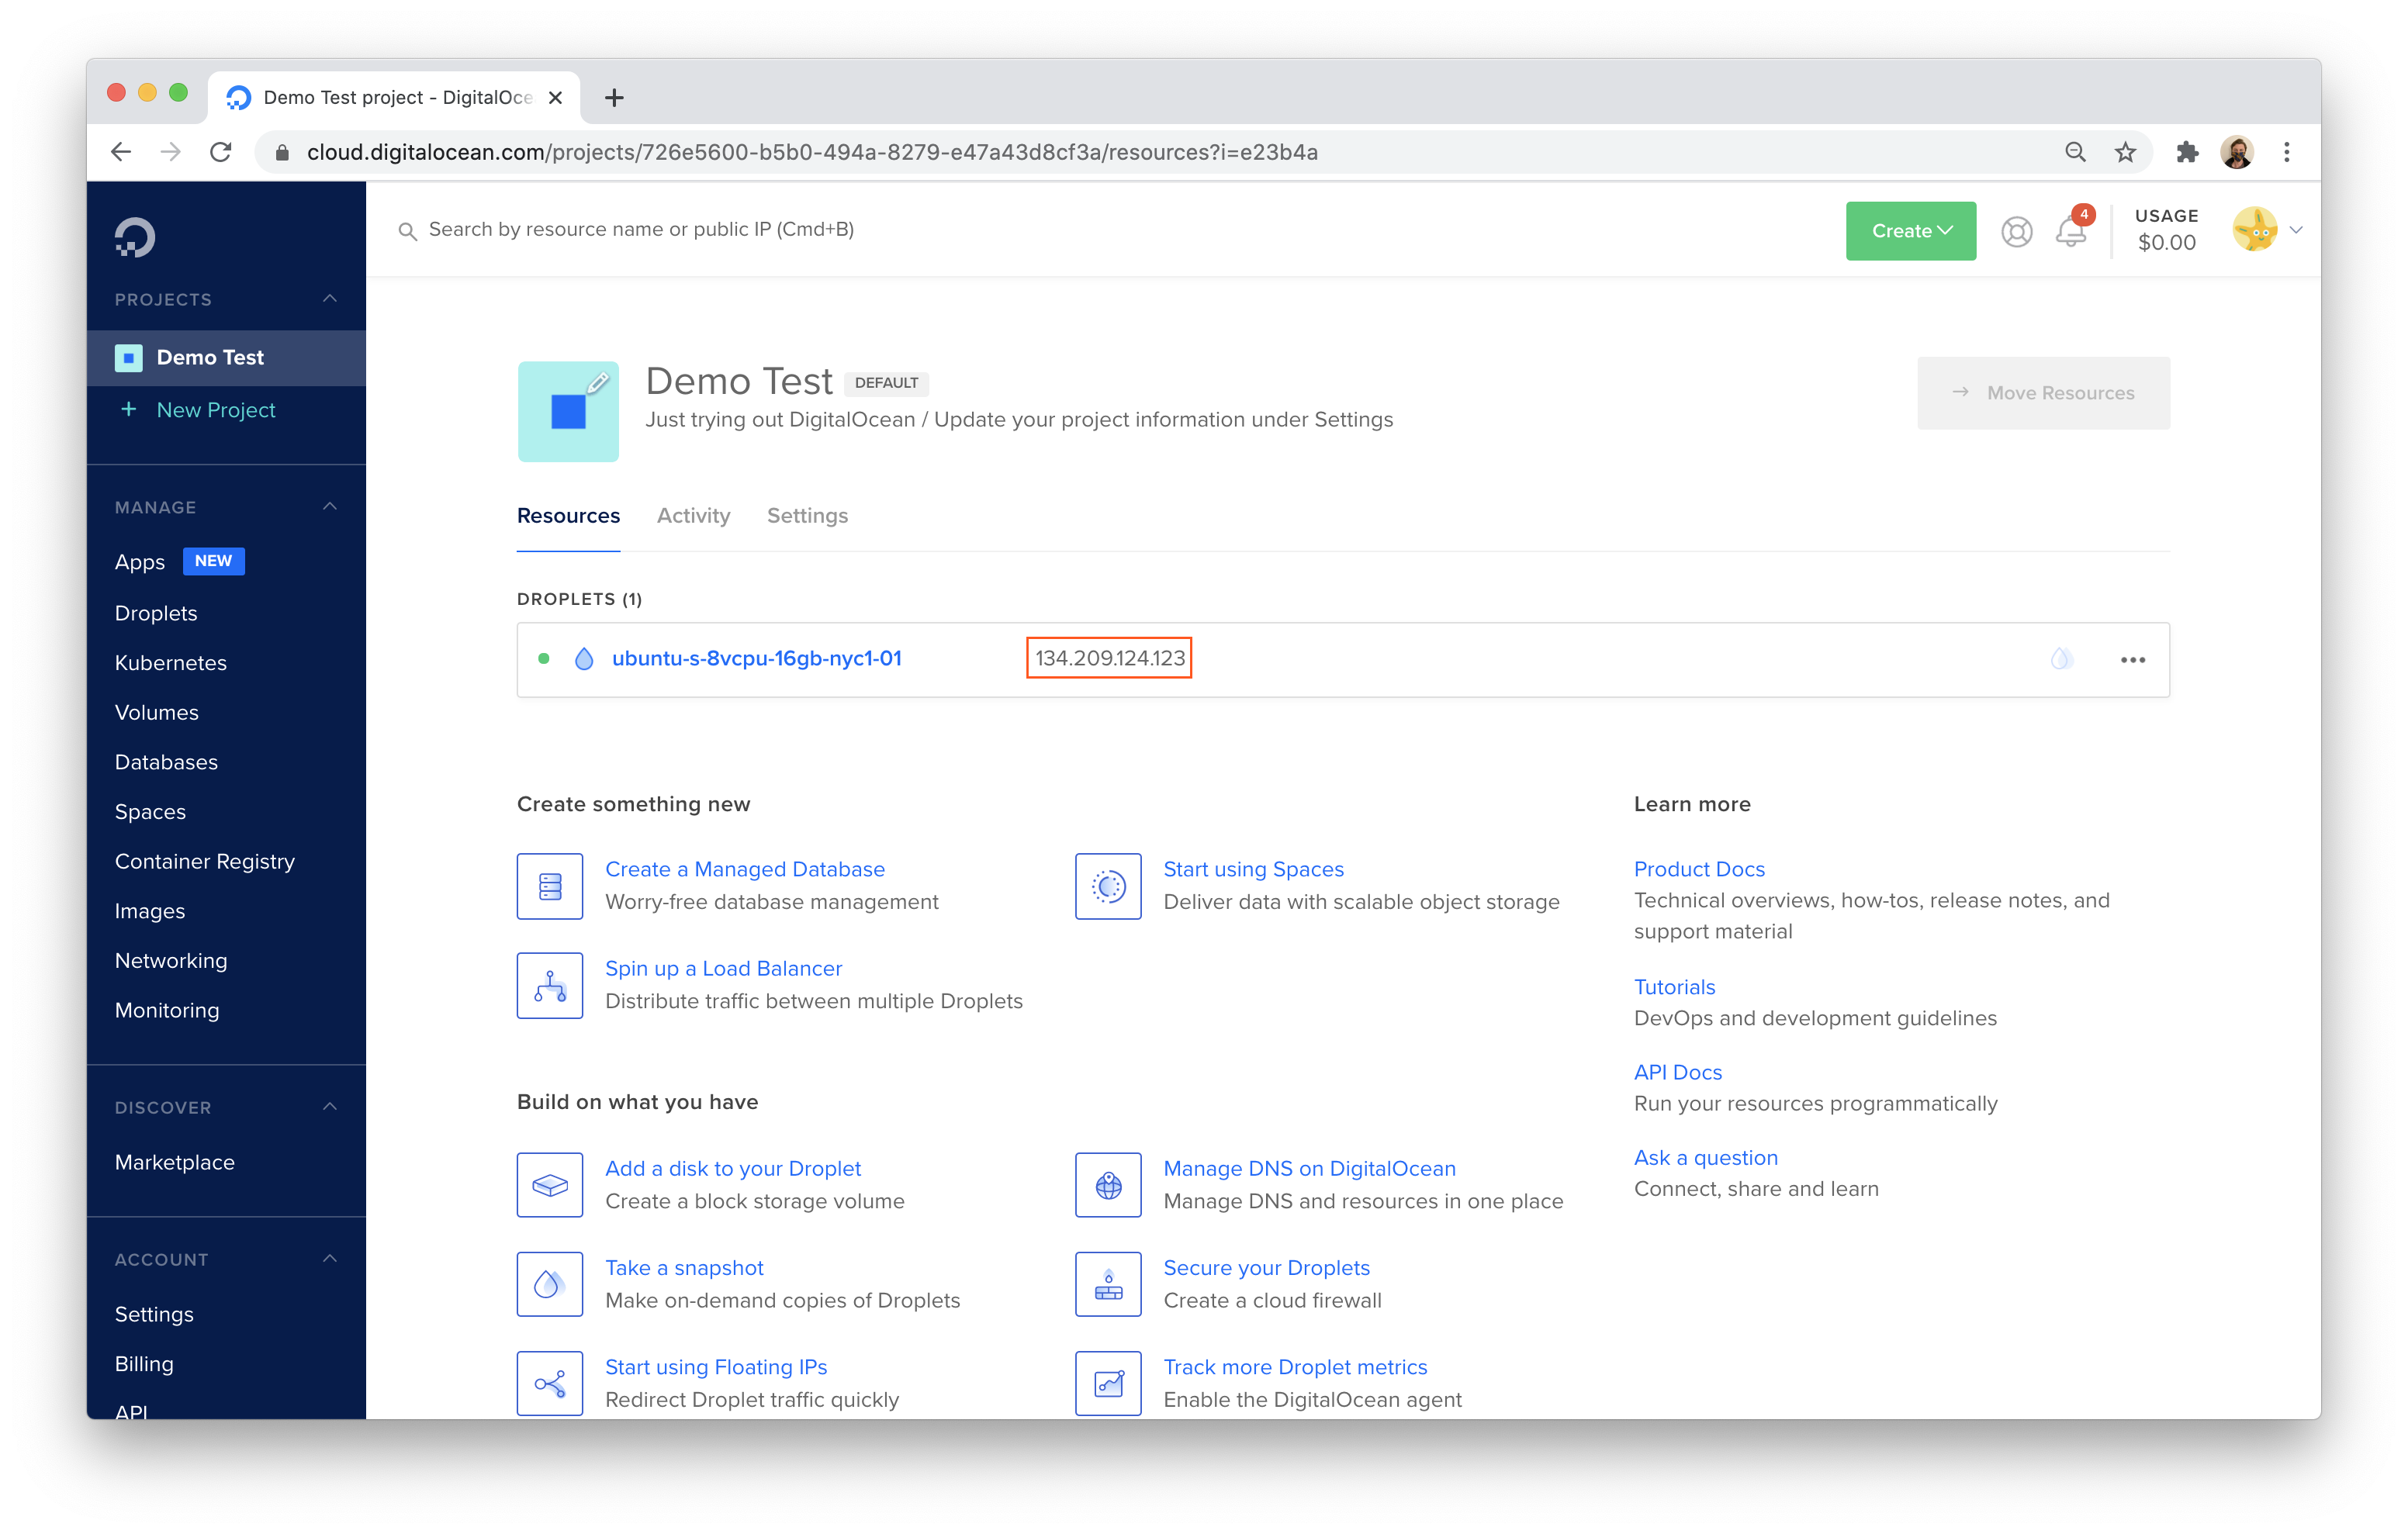
To resize a volume via DigitalOcean Control Panel, the first step is to log in to your DigitalOcean account and navigate to the Volumes section. From there, select the volume that you want to resize.Adjusting Volume Size
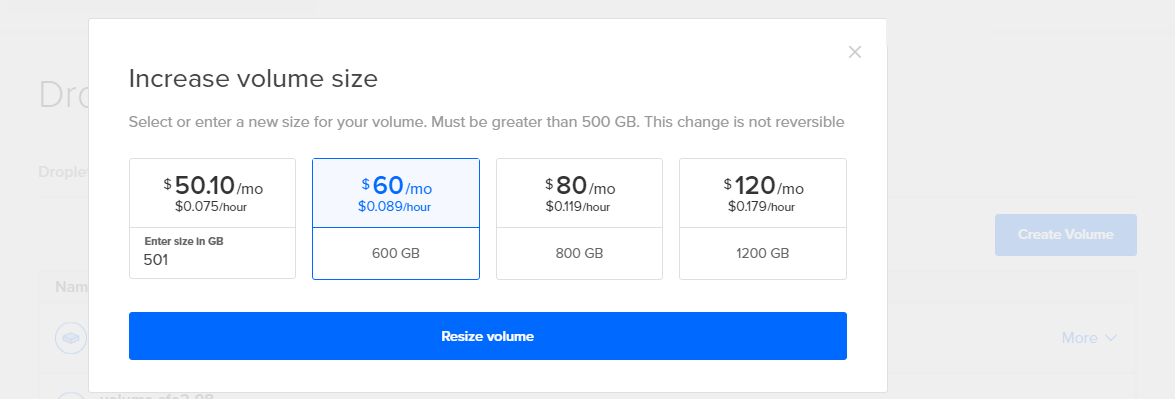
Once you have selected the volume, click on the “More” button and then select “Resize” from the dropdown menu. You will be presented with a slider that allows you to adjust the size of your volume. Simply move the slider to the desired size and click on the “Resize Volume” button. The resizing process will begin immediately and should only take a few minutes to complete. It is important to note that resizing a volume will not result in any data loss, but it is always recommended to create a backup of your data before making any changes to your volume. In conclusion, resizing a volume via DigitalOcean Control Panel is a quick and easy process that can be completed in just a few clicks. With the ability to adjust the size of your volume on-the-fly, you can ensure that your storage needs are always met without having to worry about downtime or data loss.Resizing Volume Via Command Line
Resizing the volume of your DigitalOcean droplet is a straightforward process that can be done via the command line. By utilizing Secure Shell (SSH) access and command line tools, you can easily adjust the size of your volume to meet your specific requirements. In this guide, we will walk you through the steps to resize your DigitalOcean volume using the command line.
Secure Shell (ssh) Access
In order to resize your DigitalOcean volume via the command line, you will need to have SSH access to your droplet. SSH is a secure network protocol that allows you to securely connect to remote systems and execute commands. By establishing an SSH connection to your droplet, you will be able to execute the necessary commands to resize your volume.
Command Line Tools
Once you have SSH access to your droplet, you can utilize command line tools to resize your DigitalOcean volume. DigitalOcean provides a set of command line tools that can be installed and used to manage your droplets and volumes. These tools include the doctl command line interface, which allows you to interact with your DigitalOcean resources from the command line.
To resize your volume, you will need to use the doctl command line tool and execute the appropriate command with the desired volume size. The command line syntax for resizing your volume is as follows:
doctl compute volume resize--size
Replace
It is important to note that resizing a volume will require your droplet to be powered off. Therefore, make sure to plan accordingly and schedule any necessary downtime for your application or website.
By following these steps, you can easily resize your DigitalOcean volume via the command line. Remember to always double-check the volume ID and desired size before executing the command to avoid any unintended changes. With the flexibility of resizing volumes, you can adapt your storage capacity to meet the changing needs of your applications or websites.
Verifying The Resize Operation
Verifying the Resize Operation is a crucial step after resizing a volume on DigitalOcean. It ensures that the changes have been successfully applied and that the data integrity has been maintained throughout the process.
Confirming Volume Changes
After resizing the volume, it’s essential to confirm that the changes have been implemented correctly. This involves checking the new size and ensuring that it matches the intended size adjustment.
Ensuring Data Integrity
Verifying data integrity is paramount to guarantee that the resizing operation has not caused any data corruption or loss. This step involves checking the volume for any potential errors or inconsistencies that may have arisen during the resizing process.
Troubleshooting Common Issues
Having trouble resizing volumes on DigitalOcean? Follow these simple troubleshooting tips to resolve common issues and easily resize your volume without any hassle. Say goodbye to resizing headaches and enjoy a seamless experience on DigitalOcean.
Handling Resize Errors
If you encounter resize errors, check disk space availability. Ensure proper network connection for resizing.
- Verify droplet status before resizing.
- Restart droplet if error persists.
Restoring From Backups
To restore from backups, access the control panel. Follow on-screen instructions for restoration.
- Select the backup you want to restore from.
- Confirm the restoration process to complete.

Credit: m.youtube.com
Best Practices For Volume Management
Regular Monitoring
Monitor volume usage for optimal performance.
Check volume health periodically for any issues.
Planning For Future Scalability
Estimate future storage needs and adjust volumes accordingly.
Create a growth plan to accommodate increasing data.
Credit: developers.cloudflare.com
Frequently Asked Questions
How Do I Resize Volume In Digital Ocean?
To resize a volume in DigitalOcean, follow these steps: 1. Go to the “Volumes” section in the control panel. 2. Select the volume you want to resize. 3. Click “More” and select “Resize. ” 4. Choose the new size you want for the volume.
5. Click “Resize Volume” to confirm the changes.
How Do I Resize A Droplet Disk In Digital Ocean?
To resize a droplet disk in Digital Ocean, go to the control panel, select the droplet, click on “Resize” and choose the new disk size. Then, follow the prompts to complete the process.
How Do I Resize A Volume?
To resize a volume, follow these steps: 1. Open the Amazon EC2 console. 2. Choose the instance where the volume is attached. 3. Stop the instance. 4. Modify the volume size and click Modify. 5. Start the instance. The new volume size is now available.
How Do You Scale Up A Droplet In Digital Ocean?
To scale up a DigitalOcean droplet, log in, select the droplet, click “Resize,” choose a larger plan, and confirm.
Conclusion
Resizing volumes on DigitalOcean is a straightforward process that can greatly enhance your server’s performance. By following the steps outlined in this guide, you can effectively manage your storage needs and optimize your system for efficiency. With a clear understanding of this procedure, you can confidently adapt your resources to meet your evolving requirements.


