
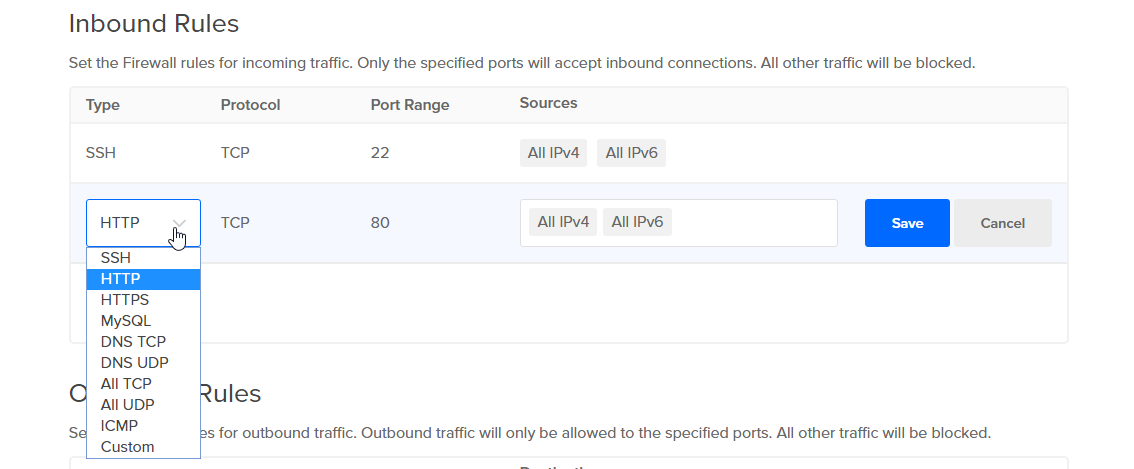
To open a port on DigitalOcean, you can follow these steps: access your Droplet’s networking settings, navigate to the “Firewalls” section, create a new firewall or edit an existing one, and add a rule to allow incoming traffic on the desired port. By doing so, you will be able to open a port on DigitalOcean.
DigitalOcean provides users with a straightforward process for opening ports on their Droplets. Whether you need to allow traffic for a specific application or service, or you simply want to enhance your server’s accessibility, this guide will walk you through the necessary steps.
By following these instructions, you will be able to successfully open a port on DigitalOcean and manage your server’s network connections effectively.
Introduction To Digitalocean Port Management
Opening ports on DigitalOcean is crucial for network communication. Proper port configuration is essential for allowing traffic to flow smoothly to and from your servers.
Importance Of Port Configuration
Ports act as doors for data to enter and exit a server. Configuring ports correctly ensures that the right information reaches the right destination.
Security Implications
Improper port settings can lead to security breaches. Securely managing ports helps prevent unauthorized access and potential data breaches.
Prerequisites For Managing Ports
To open a port on DigitalOcean, ensure you have the necessary firewall setup. Access the DigitalOcean control panel, navigate to the Networking section, and configure the firewall to allow traffic on the desired port. Double-check the settings to ensure the port is successfully opened for your server.
Before you start managing ports on DigitalOcean, there are a few prerequisites that you need to fulfill. These include setting up a DigitalOcean account and accessing the droplet. Let’s take a closer look at each of these prerequisites.Digitalocean Account Setup
The first step to managing ports on DigitalOcean is to create an account. If you don’t already have an account, you can easily create one by visiting the DigitalOcean website and following the instructions. Once you have created an account, you will need to add a payment method to your account so that you can create droplets.Accessing The Droplet
Once you have created a droplet, you will need to access it in order to manage its ports. To do this, you will need to use an SSH client such as PuTTY or Terminal. You will also need to know the IP address of your droplet and the username and password that you set up when you created the droplet.Summary
To manage ports on DigitalOcean, you need to have a DigitalOcean account and access to the droplet. Creating an account is easy, and once you have done so, you can create droplets and manage their ports. Accessing the droplet requires an SSH client and knowledge of the droplet’s IP address, username, and password. With these prerequisites in place, you are ready to start managing ports on DigitalOcean.Understanding Firewalls And Network Security
When it comes to managing a server, understanding firewalls and network security is crucial. Firewalls act as a barrier between your server and potentially harmful traffic, protecting your system from unauthorized access and cyber threats. By implementing the right firewall and network security measures, you can safeguard your DigitalOcean server and ensure smooth, secure operations.
Types Of Firewalls In Digitalocean
There are various types of firewalls that can be utilized within the DigitalOcean environment. These include:
- Software-based firewalls
- Cloud firewalls
- Custom firewalls
Best Practices For Network Security
Implementing best practices for network security is essential for protecting your DigitalOcean server. Here are some key measures to consider:
- Regularly update your firewall rules
- Restrict access to specific IP addresses
- Utilize strong authentication methods
- Implement intrusion detection systems
- Regularly monitor and analyze network traffic
Credit: forum.cloudron.io
Step-by-step Port Opening Process
To open a port on DigitalOcean, start by logging into your account and accessing the networking section. Then, navigate to the firewall and select the specific droplet to open the port for. Next, add a new rule to allow traffic through the desired port, and save the changes to complete the process.
Opening a port on your DigitalOcean Droplet can be a daunting task, especially if you are not familiar with the process. However, this guide will walk you through the step-by-step process of opening a port on your Droplet in an easy-to-understand manner.Connecting To The Droplet Via Ssh
The first step in opening a port on your Droplet is to connect to it via SSH. Follow the steps below to connect to your Droplet via SSH:- Open your terminal and type the following command:
ssh root@your_droplet_ip_address - Enter your Droplet’s root password when prompted
- You are now connected to your Droplet via SSH
Modifying The Firewall Settings
Once you are connected to your Droplet via SSH, you can modify the firewall settings to open a port. Follow the steps below to modify the firewall settings:- Type the following command to list the current firewall rules:
sudo ufw status - Type the following command to allow incoming traffic on the port you want to open:
sudo ufw allow port_number - Type the following command to enable the firewall:
sudo ufw enable - Type the following command to verify that the new rule has been added:
sudo ufw status
Configuring Ufw For Port Management
When it comes to managing ports on your DigitalOcean server, one essential tool you can use is the Uncomplicated Firewall (UFW). UFW is a user-friendly front-end for iptables, the default firewall configuration tool for Ubuntu. It allows you to easily manage and control incoming and outgoing network traffic by configuring port rules.
Enabling Ufw
To start managing your ports with UFW, you first need to enable it. Follow these simple steps:
- Connect to your DigitalOcean server via SSH using your preferred terminal application.
- Check if UFW is installed by running the command:
sudo ufw status - If UFW is not installed, you can install it by running:
sudo apt-get install ufw - Once UFW is installed, enable it by running:
sudo ufw enable - You can verify the status of UFW by running:
sudo ufw status
Adding Port Rules
After enabling UFW, you can now add port rules to control the incoming and outgoing traffic. Here’s how you can do it:
- To allow incoming traffic on a specific port, use the following command:
sudo ufw allow [port]/[optional: protocol] - For example, to allow incoming SSH traffic on port 22, you can run:
sudo ufw allow 22/tcp - If you want to allow outgoing traffic on a specific port, you can use the command:
sudo ufw allow out [port]/[optional: protocol] - To deny incoming or outgoing traffic on a specific port, replace
allowwithdenyin the command. - Remember to reload UFW after making any changes by running:
sudo ufw reload
By configuring UFW with the appropriate port rules, you can effectively manage the network traffic on your DigitalOcean server. Whether you need to allow or deny specific ports, UFW provides a straightforward way to control your server’s firewall settings.

Credit: serverhealers.com
Testing The Open Port
After opening a port on your DigitalOcean server, it’s crucial to test whether the port is indeed open and accessible. This step helps ensure that your intended services can communicate as expected.
Using Netstat To Confirm
To confirm that the port is open and listening for incoming connections, you can use the netstat command. Simply enter the following command in your terminal:
netstat -tulnThis will display a list of all open ports and the associated services. Look for the specific port number you opened to verify that it is indeed accessible.
Troubleshooting Common Issues
If you encounter difficulties with testing the open port, here are some common issues and troubleshooting steps:
- Firewall Restrictions: Ensure that your server’s firewall allows traffic on the specific port. You can adjust firewall rules using iptables or ufw.
- Service Configuration: Check that the service you intend to run on the port is properly configured and actively running.
- Network Configuration: Verify that your server’s network settings, such as IP address and gateway, are correctly configured.
By addressing these common issues, you can effectively test and ensure the successful opening of the desired port on your DigitalOcean server.
Enhancing Security With Digitalocean Cloud Firewalls
Credit: docs.digitalocean.com
Maintaining And Monitoring Open Ports
Maintaining and monitoring open ports is crucial for ensuring a secure and efficient network. Learn how to open ports on DigitalOcean to optimize your server’s performance and enhance your online presence. Stay in control of your network by following these simple steps.
Regularly reviewing port configurations is crucial for security.Regular Review Of Port Configurations
Use tools like Nmap to scan for open ports. Keep documentation updated.Automating Security Updates
Schedule regular security updates with tools like Ansible or Puppet. Ensure all software on open ports is up to date. Consider implementing a firewall to restrict access to open ports. Regularly monitor logs for any suspicious activity on open ports. Implement intrusion detection systems for real-time monitoring. Keep an eye on network traffic to detect any anomalies.Key Takeaways:
– Regularly review and update port configurations. – Automate security updates for open ports. – Monitor logs and network traffic for any unusual activity.Conclusion: Best Practices Recap
To recap the best practices for opening a port on DigitalOcean, ensure that you have the necessary permissions, understand the security risks, and use the appropriate tools and commands. It is also important to regularly monitor and update your firewall rules to ensure continued security.
Summary Of Key Steps
Opening a port on DigitalOcean involves several key steps:
- Create a new firewall rule in the DigitalOcean Control Panel.
- Specify the port number and protocol for the new rule.
- Apply the firewall rule to the desired Droplets or tags.
- Verify the successful opening of the port using network tools.
Continued Learning And Resources
For further information and resources on opening ports on DigitalOcean:
- Check out DigitalOcean’s official documentation on networking.
- Join online communities or forums for troubleshooting tips.
- Explore tutorials and guides on port management best practices.
Frequently Asked Questions
How To Enable Port In Digital Ocean?
To enable a port in Digital Ocean, you can do so by configuring the firewall settings in the networking section of your account. Simply navigate to the “Firewalls” tab, select the desired firewall, and add a new inbound rule for the specific port you wish to enable.
How Do I Open A Port Connection?
To open a port connection, you need to access your router’s settings and navigate to the port forwarding section. Then, select the port you want to open and enter the necessary information. Finally, save the changes and restart your router.
Keep in mind that opening ports can pose security risks, so proceed with caution.
Is Port 25 Open On Digital Ocean?
Yes, port 25 is open on Digital Ocean’s cloud servers, allowing for email traffic.
How To Open Port 443 In Linux?
To open port 443 in Linux, you need to modify the firewall rules. Use the command “sudo ufw allow 443” to allow incoming traffic on port 443. Make sure the necessary service is running on that port for it to function properly.
Conclusion
Opening a port on DigitalOcean is a crucial task for ensuring proper server functionality. By following the step-by-step guide and utilizing the firewall, you can secure your system while allowing specific traffic. This process enhances your server’s accessibility and security, contributing to a more efficient and reliable hosting experience.


