
To generate an SSH key on DigitalOcean, follow these steps: navigate to the “SSH Keys” section in your DigitalOcean account, click “Add SSH Key,” provide a name for the key, and paste the public key into the designated field. Generating an SSH key on DigitalOcean is a simple process that allows you to securely access your servers.
By following a few straightforward steps, you can create an SSH key and easily manage your authentication credentials. In this blog post, we will guide you through the process of generating an SSH key on DigitalOcean, ensuring a smooth and secure experience.
Let’s dive in and get started!
Credit: www.digitalocean.com
Introduction To Ssh Keys
To generate SSH key on DigitalOcean, access your terminal and use the ssh-keygen command. Follow the prompts to create your key pair. Then, add the public key to your DigitalOcean account for secure server access.
Why Ssh Is Essential
SSH (Secure Shell) is crucial for secure communication over networks.Advantages Of Using Ssh Keys
Using SSH keys provides enhanced security and convenience for authentication.Prerequisites For Generating Ssh Keys
SSH or Secure Shell Keys are used to authenticate a user to a remote server. Before generating SSH keys, you need to ensure that you have the required software and understand key pairs.
Required Software
Before generating SSH keys, you will need to ensure that you have the following software installed on your local machine:
- OpenSSH client
- PuTTY client (if you are using Windows)
These software programs will help you generate and manage your SSH keys.
Understanding Key Pairs
SSH keys are generated in pairs – a public key and a private key. The public key is stored on the remote server, while the private key is kept on your local machine. When you try to connect to the remote server, the server will verify your identity by checking your public key against the private key on your local machine.
It is important to keep your private key secure and not share it with anyone. If someone gets access to your private key, they can easily impersonate you and gain access to any server that has your public key on it.
To generate SSH keys, you must have a basic understanding of how key pairs work and the importance of keeping your private key secure.
Now that you have a basic understanding of the prerequisites for generating SSH keys, you can move on to the next step – actually generating the keys.
Step-by-step Guide To Create Ssh Keys
Creating SSH keys is an essential step in securing your server and establishing a secure connection. Below, we provide a step-by-step guide to help you generate SSH keys on DigitalOcean, ensuring that your data remains safe and protected.
Launching The Terminal
To begin, open your terminal. If you’re using a Mac or Linux, you can access the terminal by searching for it in your applications. For Windows users, you can use the built-in Command Prompt or install a third-party terminal such as Git Bash.
Generating The Key Pair
Once you have the terminal open, type the following command: ssh-keygen -t rsa -b 4096 -C "[email protected]". This command generates a new SSH key using the provided email as a label. It will prompt you to specify the file in which to save the key. Press Enter to save the key in the default location.
Setting A Secure Passphrase
After generating the key pair, you can optionally add a passphrase to provide an extra layer of security. To set a passphrase, simply follow the on-screen prompts. It’s important to choose a strong passphrase that is easy for you to remember but difficult for others to guess.
Public And Private Keys Explained
SSH or Secure Shell is a cryptographic protocol used to secure communication between two computers. SSH works by encrypting all data transmitted over a network connection to prevent unauthorized access. SSH keys are an essential part of this process, which consists of a pair of files that are generated together. These files include a public and private key, which are used to authenticate with a remote server.
Role Of Public Key
The public key is used by the remote server to verify that the private key belongs to the user who is attempting to connect. The public key is shared with the remote server and can be freely distributed without compromising security. When a user connects to a remote server, the server sends a message encrypted with the user’s public key. The user’s SSH client then decrypts the message using the private key, which proves that the user is who they claim to be.
Importance Of Private Key Security
The private key is the most critical component of the SSH key pair, and it must be kept secure at all times. If a private key is compromised, an attacker can impersonate the user and gain unauthorized access to the server. Therefore, it is essential to store the private key in a safe location, such as an encrypted USB drive or a password-protected file. Additionally, users should avoid sharing their private key with anyone or posting it publicly online.
Generating SSH keys on DigitalOcean is easy and can be done in just a few steps. Once generated, users can use their public and private keys to authenticate with remote servers securely. By understanding the role of the public key and the importance of private key security, users can ensure their SSH key pair is secure and reliable.
Adding Ssh Key To Digitalocean Account
When it comes to securing your DigitalOcean account, adding an SSH key is an essential step. SSH keys provide a secure way to authenticate your identity and establish a secure connection between your local machine and your DigitalOcean Droplets. In this guide, we will walk you through the process of adding an SSH key to your DigitalOcean account, ensuring that your account remains protected.
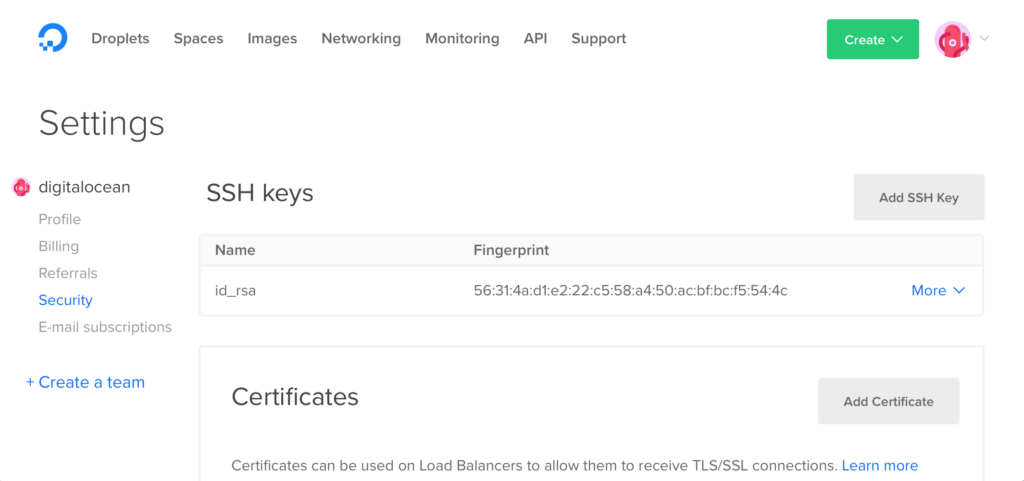
Accessing The Security Settings
In order to add your SSH key to your DigitalOcean account, you first need to access the Security Settings. Here’s how you can do it:
- Log in to your DigitalOcean account.
- Click on your profile icon in the top right corner of the screen.
- From the dropdown menu, select “Account” to navigate to your Account Settings.
- In the left sidebar, click on “Security” to access the Security Settings.
Uploading The Public Key
Once you are in the Security Settings, you can proceed with uploading your public SSH key. Here are the steps to follow:
- In the SSH Keys section, click on the “Add SSH Key” button.
- Give your SSH key a recognizable name in the “Name” field. This can be anything that helps you identify the key.
- In the “Public Key” field, paste your public key. Make sure you copy the entire key, starting with “ssh-rsa” and ending with your email address.
- Click on the “Add SSH Key” button to save your key.
Once you have successfully added your SSH key, you can now use it to authenticate your identity when connecting to your DigitalOcean Droplets. It is important to note that you should keep your private key secure and never share it with anyone.
By following these steps, you have successfully added an SSH key to your DigitalOcean account, enhancing the security of your account and ensuring secure connections to your Droplets.

Credit: bobcares.com
Verifying The Key On Digitalocean
Confirming Key Upload
After generating your SSH key pair and uploading the public key to DigitalOcean, it’s important to confirm that the key has been successfully uploaded. To do this, log in to your DigitalOcean account and navigate to the ‘Settings’ tab. Select the ‘Security’ option and then click on ‘SSH keys’ to ensure that your key is listed there.
Testing Ssh Connection
Once you have confirmed the successful upload of your SSH key, the next step is to test the SSH connection to your DigitalOcean Droplet. Open your terminal and enter the following command, replacing your_username with your actual username and your_droplet_ip with the IP address of your Droplet:
ssh your_username@your_droplet_ipIf the connection is successful, you will be prompted to enter your SSH key passphrase, and upon doing so, you will gain access to your Droplet. This verifies that your SSH key is working correctly with DigitalOcean.
Best Practices For Ssh Key Management
When it comes to SSH key management, following best practices is crucial for security.
Regular Key Rotation
Periodically update SSH keys to mitigate unauthorized access risks.
Avoiding Common Mistakes
Double-check key permissions and never share private keys.
Troubleshooting Common Ssh Key Issues
When working with SSH keys on DigitalOcean, you may encounter some common issues that can hinder your connection process. Below, we highlight some troubleshooting tips for two prevalent problems: Permission Problems and Connection Refused Errors.
Permission Problems
Incorrect file permissions can lead to SSH key authentication failures. To resolve this issue, ensure that the correct permissions are set for your SSH key files. The private key should have 600 permissions, while the .ssh directory should be set to 700.
Connection Refused Errors
If you are experiencing connection refused errors, it could be due to the SSH service not running on the server or a firewall blocking the connection. Check the SSH service status on the server and verify that the correct port (usually port 22) is open in the firewall settings.
Enhancing Security With Advanced Ssh Features
Enhance your security with advanced SSH features by generating an SSH key on DigitalOcean. By creating an SSH key pair, you can strengthen your server’s security and streamline the authentication process. This process involves generating a public and private key, which can be securely stored and used for secure access to your server.
Using Ssh Config Files
SSH config files simplify connection setup.
Customize settings for different hosts.
Implementing Two-factor Authentication
Two-factor auth adds extra layer of security.
Requires both password and authentication code.

Credit: docs.digitalocean.com
Frequently Asked Questions
How Do I Generate Ssh Keys For Digital Ocean?
To generate SSH keys for DigitalOcean, follow these steps: 1. Open your terminal or command prompt. 2. Use the command “ssh-keygen -t rsa” to generate the keys. 3. Choose a name and location for your keys. 4. Set a passphrase for added security (optional).
5. Your public and private keys will be generated and stored in the specified location.
How Do I Generate A Ssh Key?
To generate a SSH key, open your terminal and enter the command “ssh-keygen -t rsa”. Follow the prompts to name your key and add a passphrase. Your key will be saved to your home directory under “. ssh/id_rsa”.
How To Generate Id_ed25519?
To generate id_ed25519, use the ssh-keygen command in your terminal. Specify the key type as ed25519 to create the id_ed25519 file.
How To Create Ssh Key On Terminal?
To create an SSH key on terminal, follow these steps: 1. Open terminal and enter “ssh-keygen” command. 2. Press enter to accept the default file location and enter a passphrase when prompted. 3. Your key will be created and saved in the default location.
4. Use “cat ~/. ssh/id_rsa. pub” to view your public key.
Conclusion
Incorporating SSH keys into your DigitalOcean server is a secure and efficient way to manage your infrastructure. By following the simple steps outlined in this guide, you can ensure a seamless integration of SSH keys with your DigitalOcean account. This added layer of security will safeguard your data and streamline your workflow.


