
To host a PHP website on DigitalOcean, you need to create a droplet, install the necessary software (like PHP, Apache, and MySQL), and configure your domain. Once your droplet is set up, you can upload your website files and configure the server to serve your PHP website.
Hosting a PHP website on DigitalOcean allows you to have complete control over your server environment and optimize it for performance. DigitalOcean provides a user-friendly interface, flexibility in server configuration, and affordable pricing plans. We will walk you through the steps to host your PHP website on DigitalOcean, from creating a droplet to configuring your domain.
Whether you are a beginner or an experienced developer, this guide will help you get your PHP website up and running smoothly on DigitalOcean. So let’s dive in and start hosting your PHP website on DigitalOcean!
Introduction To Php Hosting On Digitalocean
Host your PHP website on DigitalOcean with ease. With their user-friendly interface and affordable pricing plans, you can quickly deploy your PHP application and start serving your users in no time.
Hosting a PHP website on DigitalOcean is a reliable and efficient way to ensure your website runs smoothly. DigitalOcean offers a robust platform for hosting PHP websites, providing users with the flexibility and scalability needed to support various web applications.
Benefits Of Using Digitalocean For Php Websites
- High performance and fast loading times
- Scalability to accommodate growing traffic
- Secure infrastructure with regular updates
- Easy deployment and management of PHP applications
Prerequisites For Hosting On Digitalocean
- Create a DigitalOcean account
- Choose a suitable server size and configuration
- Install PHP and necessary dependencies
- Set up a web server like Apache or Nginx
Setting Up A Digitalocean Account
To set up a DigitalOcean account for hosting a PHP website, start by signing up on the DigitalOcean website. Once registered, create a new droplet, select the PHP application, and configure the necessary settings. After the droplet is created, upload the PHP website files and configure the domain to complete the hosting process.
Creating An Account
Creating a DigitalOcean account is a straightforward process that takes only a few minutes. Follow these steps to set up an account:- Go to the DigitalOcean website and click on the “Sign Up” button.
- Enter your email address, create a password, and choose a username for your account.
- Select your payment method and enter your billing information.
- Verify your email address by clicking on the verification link sent to your inbox.
- Log in to your account and navigate to the dashboard to create a Droplet.
Understanding Droplet Pricing
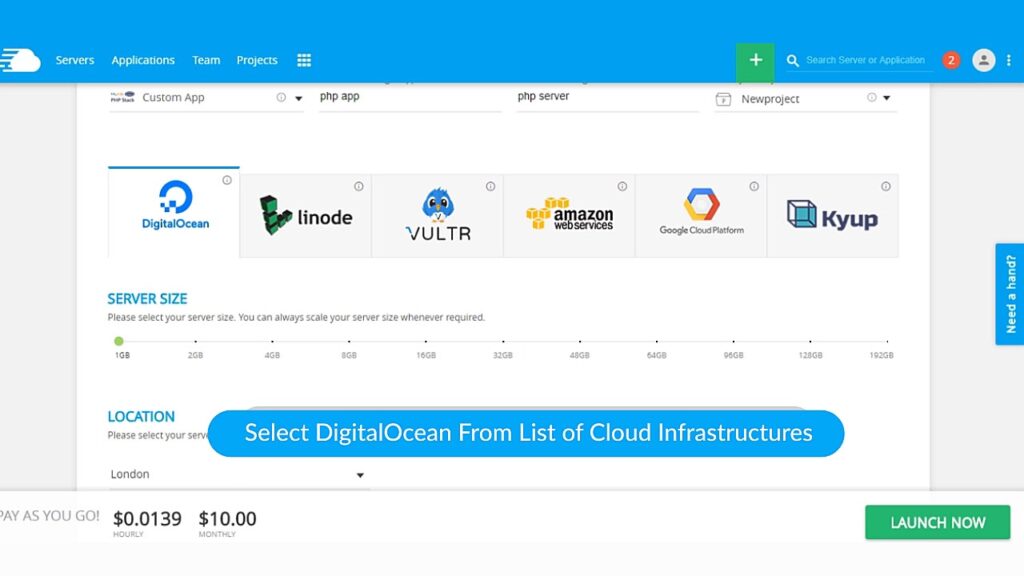
Before creating a Droplet, it’s essential to understand DigitalOcean’s pricing structure. Droplets are virtual machines that run on DigitalOcean’s cloud infrastructure. The price of a Droplet varies depending on its size, location, and features. Here are some key points to keep in mind:- Droplets start at $5 per month and go up to $1,200 per month.
- The cost of a Droplet increases as its size and features increase.
- Droplets can be billed hourly or monthly, depending on your preference.
- You can create, resize, and destroy Droplets at any time, and you’ll only be charged for the time you use them.
Choosing The Right Droplet For Php Hosting
When it comes to hosting a PHP website on DigitalOcean, choosing the right droplet is crucial for optimal performance and efficiency. The right droplet configuration can significantly impact the speed, stability, and scalability of your PHP applications. In this article, we’ll explore the key considerations for selecting the most suitable droplet for hosting PHP websites on DigitalOcean.
Droplet Configurations And Options
There are various droplet configurations and options available on DigitalOcean, each catering to different performance and resource requirements. The key factors to consider when choosing a droplet for PHP hosting include CPU, RAM, storage, and bandwidth. Let’s delve into each aspect to understand how it influences the hosting environment for PHP applications.
Optimizing Performance For Php Applications
Optimizing performance for PHP applications is essential to ensure smooth and efficient functioning. This involves fine-tuning the server environment, leveraging caching mechanisms, and optimizing the PHP configuration. By implementing these performance enhancements, you can significantly boost the speed and responsiveness of your PHP websites, providing an enhanced user experience.
Installing A Lamp/lemp Stack
If you want to host your PHP website on DigitalOcean, you need to install a LAMP/LEMP stack first. A LAMP/LEMP stack consists of Linux, Apache/Nginx, MySQL, and PHP. In this tutorial, we will guide you through the step-by-step installation of Apache/Nginx, MySQL, and PHP, and securing your web stack.
Step-by-step Installation Of Apache/nginx, Mysql, And Php
To get started, you need to log in to your DigitalOcean account and create a Droplet. Once you have created a Droplet, you can proceed with the following steps:
Step 1: Update the System
To update the system, run the following command:
sudo apt-get update
sudo apt-get upgrade
Step 2: Install Apache/Nginx
To install Apache/Nginx, run the following command:
sudo apt-get install apache2
sudo apt-get install nginx
Step 3: Install MySQL
To install MySQL, run the following command:
sudo apt-get install mysql-server
Step 4: Install PHP
To install PHP, run the following command:
sudo apt-get install php libapache2-mod-php php-mysql
If you are using Nginx, run the following command instead:
sudo apt-get install php-fpm php-mysql
Securing Your Web Stack
After you have installed the LAMP/LEMP stack, it’s important to secure your web stack to prevent unauthorized access. Here are a few tips:
- Change the default SSH port
- Create a new user with sudo privileges
- Disable root login
- Use a firewall to block unwanted traffic
- Use HTTPS to encrypt data transfer
By following these steps, you can ensure that your web stack is secure and your PHP website is safe from hackers.
Uploading Your Php Website
To host a PHP website on DigitalOcean, you need to follow some steps. Firstly, create a droplet with your preferred configuration. Secondly, upload your PHP files to the droplet using an FTP client. Finally, configure your web server and domain name to point to the droplet’s IP address.
Transferring Files Via Sftp
To upload your PHP website to DigitalOcean, you’ll need to transfer your files using SFTP (Secure File Transfer Protocol). SFTP provides a secure way to transfer files between your local computer and your DigitalOcean droplet. To get started, you’ll need an SFTP client. There are several options available, such as FileZilla, Cyberduck, or WinSCP. Once you have your SFTP client installed and running, follow these simple steps:- Launch your SFTP client and enter the necessary connection details. This typically includes the hostname (your droplet’s IP address), your username (often ‘root’), and your password or SSH key.
- Connect to your droplet by clicking the ‘Connect’ or ‘Connect to Server’ button.
- Navigate to the directory on your droplet where you want to upload your PHP website. This is typically the ‘var/www/html’ directory.
- On your local computer, locate the folder containing your PHP website files.
- Select the files and folders you want to upload and drag them into the appropriate directory on your droplet. This will initiate the file transfer process.
- Wait for the transfer to complete. The duration will depend on the size of your files and your internet connection speed.
Setting Up File Permissions
Once you’ve successfully uploaded your PHP website files, it’s important to set up the correct file permissions to ensure your website functions properly and remains secure. File permissions determine who can read, write, or execute files on your server. To set up file permissions, follow these steps:- Access your droplet using SSH.
- Navigate to the directory where your PHP website files are located, typically ‘var/www/html’.
- Run the following command to set the correct permissions for your PHP files:
sudo find . -type d -exec chmod 755 {} \; - Next, run the following command to set the correct permissions for your PHP files:
sudo find . -type f -exec chmod 644 {} \; - Your file permissions are now properly configured, and your PHP website is ready to be accessed and used by visitors.
Configuring Your Domain And Ssl
To host a PHP website on DigitalOcean, configure your domain and SSL for secure browsing. Set up your server to support PHP scripts and install SSL certificates for encryption. Safeguard your website and ensure smooth functionality for visitors.
Domain Name Configuration
Configuring your domain name is a crucial step in the process of hosting a PHP website on DigitalOcean. Follow these simple steps to point your domain to your DigitalOcean droplet:
- Log in to your domain registrar’s website and access your domain management settings.
- Locate the DNS settings or name servers section.
- Update the name servers to DigitalOcean’s name servers: ns1.digitalocean.com, ns2.digitalocean.com, and ns3.digitalocean.com.
- Save the changes and allow some time for the DNS records to propagate across the internet.
Enabling Https With Let’s Encrypt
Securing your website with HTTPS is essential for data privacy and trust. Let’s Encrypt provides free SSL certificates, making it easy to enable HTTPS on your PHP website:
- Access your DigitalOcean droplet via SSH using a terminal or command prompt.
- Install Let’s Encrypt Certbot by running the command:
sudo apt-get install certbot python3-certbot-apache. - Obtain an SSL certificate for your domain by executing the command:
sudo certbot --apache -d yourdomain.com. - Follow the on-screen prompts to configure your SSL certificate and enable automatic renewal.
Database Management For Php Applications
Database management is crucial for PHP applications. If you’re wondering how to host your PHP website on DigitalOcean, this guide will walk you through the process step by step. Discover the best practices for managing your database and ensuring smooth functionality for your PHP application.
When hosting a PHP website on DigitalOcean, efficient database management is crucial for optimal performance. Let’s delve into the essentials of managing databases for PHP applications.
Creating And Managing Mysql Databases
1. Create a new MySQL database through the DigitalOcean control panel.
2. Utilize phpMyAdmin or MySQL command line to manage database tables.
3. Regularly backup your MySQL databases to prevent data loss.
Connecting Php To Mysql
1. Configure database connection settings in your PHP application using mysqli or PDO.
2. Use secure connection methods like prepared statements to prevent SQL injections.
3. Test the connection to ensure PHP interacts seamlessly with MySQL databases.
Credit: www.cloudways.com
Monitoring And Maintaining Your Php Website
To host a PHP website on DigitalOcean, you can start by creating a Droplet with the LAMP stack. Then, upload your website files and configure the virtual host. After that, you can monitor the website’s performance and maintain its security by installing updates and using tools like Fail2ban.
Setting Up Monitoring Tools
Regular Maintenance Tasks
Monitoring and maintaining your PHP website is crucial for optimal performance. Setting up monitoring tools allows you to track performance metrics and detect issues early. Regular maintenance tasks include updating plugins and themes, backing up data, and optimizing database. Setting Up Monitoring Tools: – Utilize tools like New Relic or Datadog – Monitor server uptime and response time Regular Maintenance Tasks: 1. Perform regular backups of your website 2. Check for updates to PHP version and plugins 3. Optimize database to improve loading speedScaling Your Php Application
When your PHP application begins to experience increased traffic, scaling becomes essential for optimal performance.
When And How To Scale
Scaling your PHP application should be done proactively based on increasing traffic.
Utilize vertical scaling by upgrading resources on a single server for small applications.
For larger applications, implement horizontal scaling by adding more servers.
Load Balancing And High Availability
Load balancing distributes traffic efficiently across multiple servers.
Ensure high availability by setting up failover mechanisms for uninterrupted service.

Credit: m.youtube.com
Troubleshooting Common Issues
Learn how to troubleshoot common issues when hosting a PHP website on DigitalOcean. Discover step-by-step solutions and avoid the frustration of encountering errors during the hosting process. Master the art of problem-solving and ensure a smooth hosting experience.
Debugging Php Errors
If your PHP website encounters errors, use the following steps:
- Check PHP error logs for specific error details.
- Review your PHP code for syntax errors.
- Ensure PHP extensions are correctly installed.
Solving Server Downtime Issues
To address server downtime, follow these steps:
- Check server resource utilization.
- Monitor server logs for any anomalies.
- Implement a robust backup and recovery strategy.
Backup And Disaster Recovery Strategies
Ensuring the security and integrity of your website is crucial for any online presence. Developing a robust backup and disaster recovery strategy is essential to safeguard your PHP website hosted on DigitalOcean. By implementing automated backups and understanding how to restore from them, you can mitigate the impact of potential data loss and downtime.
Automating Backups
Automating backups of your PHP website on DigitalOcean is vital for ensuring data security. Utilize tools like rsync or SCP to automate the backup process. Set up a cron job to schedule regular backups, ensuring that your website’s files and databases are consistently backed up to a secure location. It’s important to consider the frequency of backups to minimize the risk of data loss.
Restoring From Backups
Understanding how to restore your PHP website from backups is equally important. Familiarize yourself with the process of retrieving and deploying backups in the event of data loss or website corruption. Utilize tools like SCP or rsync to transfer backup files from the storage location to your DigitalOcean server. Once the files are transferred, follow a systematic approach to restore your website to its previous state, ensuring minimal downtime and data loss.
Conclusion And Best Practices
Discover the best practices for hosting a PHP website on DigitalOcean. Learn step-by-step instructions and expert tips to ensure a smooth and efficient hosting experience. Maximize performance and security with this comprehensive guide.
Summarizing Key Takeaways
After exploring the process of hosting a PHP website on DigitalOcean, let’s summarize the key takeaways:
- Choose the appropriate DigitalOcean droplet size based on your website’s requirements.
- Opt for the latest stable version of PHP and regularly update it for security and performance improvements.
- Secure your PHP website by implementing SSL certificates and configuring firewall rules.
- Utilize a web server like Apache or Nginx to serve your PHP website efficiently.
- Make use of a database management system such as MySQL or PostgreSQL to handle data storage and retrieval.
- Set up automatic backups to ensure the safety of your website’s data.
- Consider using a version control system like Git to manage your website’s source code and facilitate collaboration.
Final Tips For Php Hosting Success
Here are some final tips to ensure a successful PHP hosting experience on DigitalOcean:
- Optimize your PHP code: Write clean and efficient code to enhance the performance of your website.
- Monitor your website: Regularly monitor your website’s performance, uptime, and security to identify and address any issues.
- Implement caching: Utilize caching techniques like opcode caching and object caching to improve the speed and responsiveness of your PHP website.
- Regularly update your dependencies: Keep your PHP frameworks, libraries, and plugins up to date to benefit from bug fixes, new features, and security patches.
- Optimize your database: Fine-tune your database queries, use indexing, and remove unnecessary data to optimize the performance of your PHP website.
By following these best practices and tips, you can ensure a smooth and secure hosting experience for your PHP website on DigitalOcean.
Credit: dev.to
Frequently Asked Questions
How To Host A Php Based Website?
To host a PHP based website, choose a reliable web hosting provider. Opt for a plan that supports PHP, MySQL, and offers adequate storage and bandwidth. Upload your website files to the hosting server using an FTP client or file manager.
Test your website to ensure proper functionality.
Can I Host My Website On Digitalocean?
Yes, you can host your website on DigitalOcean. It offers reliable and scalable cloud hosting services for websites and applications. DigitalOcean provides easy-to-use tools and a user-friendly interface for managing your hosting. It is a popular choice for developers and businesses looking for high-performance and cost-effective hosting solutions.
How To Run Local Php Website?
To run a local PHP website, install a local server like XAMPP, WampServer, or MAMP. Place your PHP files in the server’s designated folder. Access the site by typing “localhost” and your file path in the browser.
How To Upload Php Website Into Remote Server?
To upload a PHP website into a remote server, you need to follow these steps: 1. Connect to the server using an FTP client or cPanel. 2. Upload your website files and folders to the server. 3. Create a MySQL database and user on the server, and import your website’s database.
4. Modify your website’s configuration files to reflect the new server settings. 5. Test your website to ensure it’s functioning correctly on the new server.
Conclusion
Hosting a PHP website on DigitalOcean is a reliable and efficient choice for your online presence. With its user-friendly interface and scalable infrastructure, DigitalOcean provides the tools you need to succeed. By following the steps outlined in this guide, you can confidently launch and manage your PHP website with ease.


