
To redirect from https://www.A.com to www.A.com in DigitalOcean, you can use the .htaccess file by adding a RewriteRule. This will ensure that all traffic is redirected from the HTTPS version to the non-HTTPS version of your website.
By following this method, you can easily manage your website’s URL structure and improve your SEO rankings. Additionally, it is important to note that implementing this redirection can help avoid duplicate content issues and provide a better user experience.
Credit: en.wikipedia.org
Introduction To Ssl/tls For Website Security
Secure your website by migrating from Http to Https on DigitalOcean using SSL/TLS. Enhance security and trustworthiness for users visiting www. a. com.
SSL/TLS protocols ensure secure data transmission on websites. Implementing HTTPS on your website is crucial for safeguarding sensitive information.
Importance Of Https
HTTPS encrypts data exchanged between users and servers, protecting against cyber threats.
Benefits Of Secure Connections
- Enhanced data security
- Improved trust among visitors
- Higher search engine rankings
Prerequisites For Ssl Setup On Digitalocean
To set up SSL on DigitalOcean, you need a registered domain, access to the domain’s DNS settings, and a web server configured to serve the domain. Installing Certbot and obtaining an SSL certificate are also essential steps. After that, you can redirect HTTP to HTTPS by updating your server configuration to force all traffic to the secure HTTPS protocol.
Digitalocean Account Creation
To set up SSL on DigitalOcean, you must first create an account. The process is straightforward and requires an email address, username, and password. Once you have created your account, you will need to verify it by clicking on the link sent to your email.Domain Registration And Configuration
After creating your DigitalOcean account, the next step is to register a domain name and configure it. The domain name is the web address that your visitors will use to access your website. You can purchase a domain name from a domain registrar such as GoDaddy, Namecheap, or Google Domains. Once you have registered your domain name, you will need to configure it by updating the DNS records. This involves adding an “A” record that points to your server’s IP address. You can do this by logging in to your domain registrar’s dashboard and navigating to the DNS management section.Ssl Certificate Installation
With your DigitalOcean account created and your domain registered and configured, you can now install an SSL certificate. An SSL certificate encrypts the data that is transmitted between your server and your visitors’ web browsers, ensuring that sensitive information is secure. To install an SSL certificate on DigitalOcean, you can use Let’s Encrypt, a free and open-source certificate authority. Let’s Encrypt provides automated tools that make it easy to obtain and install SSL certificates. Alternatively, you can purchase an SSL certificate from a third-party provider and install it manually. By following these prerequisites, you can set up SSL on DigitalOcean and secure your website. Creating a DigitalOcean account, registering and configuring your domain, and installing an SSL certificate are essential steps in ensuring that your visitors’ data is secure.Choosing The Right Ssl Certificate
When it comes to securing your website, choosing the right SSL certificate is crucial. SSL certificates are essential for encrypting data and providing a secure connection between your website and its visitors. With so many options available, it’s important to understand the different types of SSL certificates and the free vs paid SSL options to make an informed decision for your website.
Types Of Ssl Certificates
SSL certificates come in various types, each offering different levels of security and validation. The main types of SSL certificates include:
- Domain Validated (DV) SSL Certificates
- Organization Validated (OV) SSL Certificates
- Extended Validation (EV) SSL Certificates
Free Vs Paid Ssl Options
When considering SSL options, you’ll encounter both free and paid SSL certificates. Free SSL certificates are typically provided by Certificate Authorities such as Let’s Encrypt and offer basic encryption for your website. On the other hand, paid SSL certificates often come with additional features such as higher warranty levels, greater customer trust, and support for wildcard or multi-domain configurations.
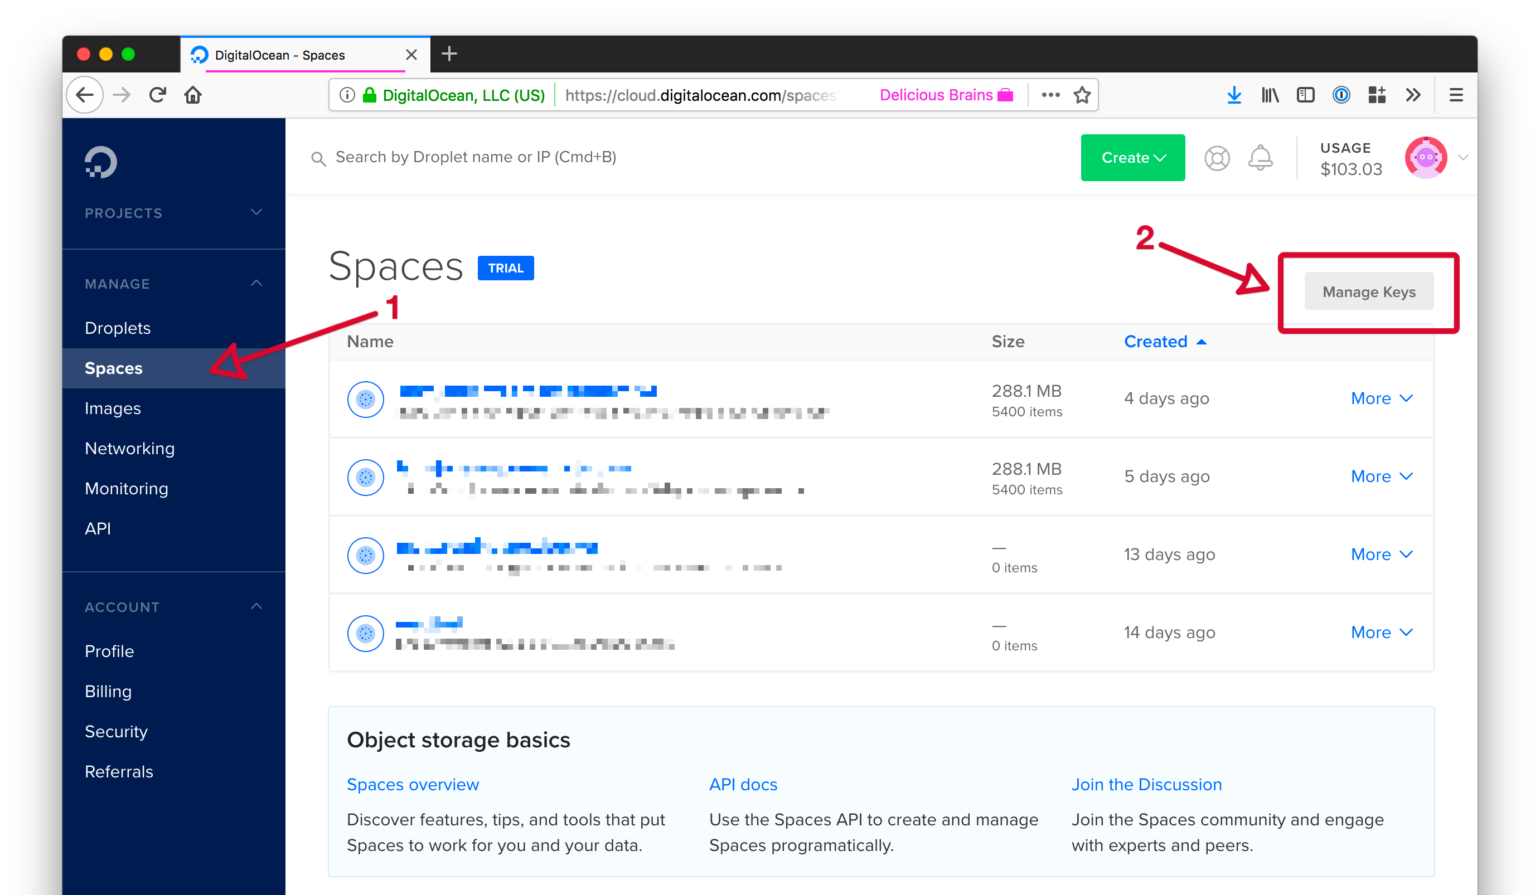
Credit: deliciousbrains.com
Setting Up A Droplet For Your Website
If you want to make your website more secure and trustworthy, you might want to consider switching from HTTP to HTTPS. DigitalOcean is one of the most popular cloud hosting providers on the market, and it offers an easy way to set up a droplet for your website. In this post, we’ll guide you through the process of configuring your server environment, installing necessary software, and setting up HTTPS for your website.
Configuring The Server Environment
Before you can start installing software and setting up HTTPS, you need to configure your server environment. This includes setting up a firewall, creating a non-root user, and disabling root login.
You can use DigitalOcean’s cloud firewall to control incoming and outgoing traffic to your droplet. This will help protect your server from unauthorized access and malicious attacks. You should also create a non-root user and disable root login to prevent unauthorized access to your server.
Installing Necessary Software
Once you’ve configured your server environment, you can start installing the necessary software for your website. This includes a web server, a database, and PHP. DigitalOcean offers a one-click installation for popular web servers like Apache and Nginx, which makes the process quick and easy.
You’ll also need to install a database management system like MySQL or PostgreSQL and configure it to work with your web server. Finally, you’ll need to install PHP and any necessary extensions for your website.
Setting Up Https For Your Website
Now that you’ve configured your server environment and installed the necessary software, it’s time to set up HTTPS for your website. This involves obtaining an SSL/TLS certificate and configuring your web server to use HTTPS.
You can obtain a free SSL/TLS certificate from Let’s Encrypt, which is a nonprofit organization that provides free SSL/TLS certificates. Once you’ve obtained your certificate, you’ll need to configure your web server to use HTTPS. This involves updating your virtual host configuration and redirecting HTTP requests to HTTPS.
By following these steps, you can easily set up a droplet for your website on DigitalOcean and make it more secure and trustworthy by switching to HTTPS.
Installing Let’s Encrypt Ssl On Digitalocean
Learn how to install Let’s Encrypt SSL on DigitalOcean and secure your website with HTTPS. This step-by-step guide will show you how to easily transition from HTTP to HTTPS on your DigitalOcean droplet.
Securing your website with an SSL certificate is crucial in today’s digital landscape. Not only does it protect the sensitive information of your visitors, but it also boosts your website’s credibility and improves search engine rankings. In this article, we will guide you through the process of installing Let’s Encrypt SSL on DigitalOcean, a popular cloud hosting provider.
Using Certbot For Ssl Installation
Certbot is a widely-used tool that simplifies the installation and management of SSL certificates. It automates the process and eliminates the need for manual configuration. Here are the steps to install Let’s Encrypt SSL using Certbot on DigitalOcean:
- First, ensure that you have SSH access to your DigitalOcean droplet. You can either use the web-based console or an SSH client like PuTTY.
- Login to your droplet using SSH by entering the command
ssh root@your_droplet_ipand providing the root password. - Update the package manager by running
apt-get updatecommand. - Install Certbot by executing the following command:
apt-get install certbot. - Once Certbot is installed, run the command
certbot certonly --webrootto generate the SSL certificate. - Follow the prompts to enter your domain name and the webroot directory of your website.
- Certbot will automatically verify your domain ownership and generate the SSL certificate.
- After successful installation, Certbot will display the path to the SSL certificate and private key.
- Update your web server configuration to use the generated SSL certificate.
- Restart your web server to apply the changes.
Automating Renewal Process
Let’s Encrypt SSL certificates have a validity period of 90 days. To ensure uninterrupted security, it is essential to automate the renewal process. Here’s how you can automate the SSL certificate renewal on DigitalOcean using Certbot:
- Create a cron job by running the command
crontab -e. - Add the following line to the crontab file:
0 0 certbot renew --quiet. - Save and exit the crontab editor.
- The cron job will run daily at midnight to check for certificate expiry and automatically renew it if necessary.
- With automated renewal in place, you can rest assured that your SSL certificate will remain valid without any manual intervention.
By following these steps, you can easily install Let’s Encrypt SSL on your DigitalOcean droplet using Certbot. Remember to automate the renewal process to ensure continuous website security. Protect your visitors’ data and gain the trust of search engines with an SSL-secured website.
Configuring Nginx To Serve Https
Configuring Nginx to Serve HTTPS is an essential step in enhancing the security and trustworthiness of your website. By enabling HTTPS, you provide a secure connection for your users, encrypting the data transmitted between their browser and your server. This process involves adjusting firewall settings and updating Nginx configuration files to ensure that your website is served over HTTPS successfully.
Adjusting Firewall Settings
To begin the process of configuring Nginx to serve HTTPS, it’s crucial to adjust the firewall settings on your DigitalOcean droplet. This allows incoming traffic on the HTTPS port (443) to reach your server, enabling secure communication between clients and the Nginx web server.
Updating Nginx Configuration Files
Once the firewall settings are adjusted, the next step is to update the Nginx configuration files to enable the HTTPS protocol. This involves modifying the server block in the Nginx configuration to include the SSL certificate and private key, as well as specifying the SSL protocols and ciphers to be used for secure connections.
Testing And Troubleshooting Ssl Implementation
Ensuring proper SSL implementation is crucial for website security and trust. Testing and troubleshooting SSL ensures a seamless transition from HTTP to HTTPS on DigitalOcean. Let’s dive into the essential steps for a successful SSL implementation.
Ssl Verification Tools
Use SSL verification tools to validate SSL certificates and configurations. Tools like SSL Labs, Qualys SSL Server Test, and KeyChest help ensure SSL is correctly implemented.
Common Ssl Configuration Errors
- Incorrect certificate installation
- Mismatched domain names
- Insecure SSL protocols
- Expired certificates
- Missing intermediate certificates
Regularly check for these common SSL configuration errors to maintain a secure and error-free HTTPS setup.

Credit: www.digitalocean.com
Enforcing Https And Redirecting Traffic
Enforcing HTTPS and redirecting traffic from http to https is crucial for website security and SEO. In DigitalOcean, you can easily enable HTTPS and redirect all traffic from http to https by installing an SSL certificate and configuring server blocks in Nginx.
Setting Up Http To Https Redirection
Enforcing HTTPS ensures secure data transfer between users and your website.
Setting up HTTP to HTTPS redirection is crucial for security and SEO.
Redirect HTTP traffic to HTTPS to avoid security risks and boost trust.
Ensuring Hsts For Security Enhancement
HSTS protects against downgrade attacks and enhances overall website security.
Enable HSTS to enforce secure connections and prevent unauthorized access.
Implement HSTS headers to secure all communication with your website.
Maintaining Ssl Health And Security
To maintain SSL health and security, it’s important to redirect from HTTP to HTTPS. In DigitalOcean, you can achieve this by configuring the server to redirect traffic from “http://www. a. com” to “https://www. a. com. ” This ensures a secure and seamless user experience while enhancing website security.
Regular Certificate Renewals
To ensure SSL health, renew certificates before expiration.Monitoring Ssl For Vulnerabilities
Regularly check SSL to prevent security risks. For maintaining SSL health and security, focus on two crucial aspects: Regular Certificate Renewals and Monitoring SSL for Vulnerabilities. Regular Certificate Renewals – Renew SSL certificates before they expire. – Update certificates to ensure secure connections. Monitoring SSL for Vulnerabilities – Use tools to check SSL health. – Address vulnerabilities promptly to prevent risks.Frequently Asked Questions
How To Redirect Www To Non-www Digitalocean?
To redirect www to non-www on DigitalOcean, you need to create a. htaccess file and add a code snippet to it. First, log in to your server using SSH. Then navigate to the root directory of your website and create a.
htaccess file. Finally, add the code snippet to redirect all traffic from www to non-www. Save and exit the file, and the redirection should be in effect.
How To Redirect A Domain To Another Domain On Digitalocean?
To redirect a domain to another on DigitalOcean, use the Domain section in the Control Panel. Add a new domain and configure the CNAME or A record to point to the destination domain’s IP address.
How To Link Domain Name To Digital Ocean Droplet?
To link a domain name to a DigitalOcean droplet, you need to follow these steps: 1. Access your domain registrar’s DNS settings. 2. Add an “A” record with your droplet’s IP address. 3. Save the changes. It may take some time for the changes to propagate.
4. Verify the connection by visiting your domain in a web browser.
How Do I Add Www To A Domain?
To add www to a domain, access your domain registrar’s settings and set up a CNAME record for the www subdomain pointing to your domain. This can usually be done in the DNS management section. If you’re not sure how to do this, contact your domain registrar’s support for assistance.
Conclusion
In a nutshell, migrating from Https Www. A. Com to Www. A. Com in DigitalOcean is a crucial step for website security and performance. By following the detailed guide provided, you can seamlessly make this transition and ensure a smooth experience for your users.
With the proper precautions, this process can be both efficient and beneficial for your website.


