
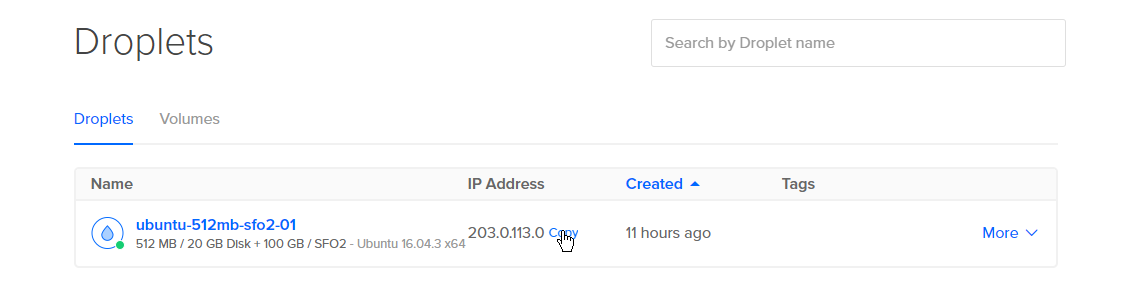
To access a DigitalOcean Droplet, log in to your DigitalOcean account and navigate to the Droplets section. From there, click on the desired Droplet and select “Access” to view the login credentials and options for connecting to the Droplet.
DigitalOcean Droplets are virtual machines that provide scalable computing resources for developers and businesses. With its user-friendly interface and robust features, DigitalOcean makes it easy to manage and access your Droplets. Whether you’re a beginner or an experienced developer, this guide will walk you through the process of accessing your DigitalOcean Droplet with clear and concise instructions.
So let’s dive in and learn how to access your Droplet effortlessly.
Introduction To Digitalocean Droplets
What Is A Droplet?
A DigitalOcean Droplet is a scalable virtual private server that provides developers with a flexible and cost-effective cloud computing solution.
Benefits Of Using Digitalocean
- Fast: Instantly create and deploy servers.
- Simple: User-friendly interface for easy management.
- Scalable: Easily resize resources as needed.
- Secure: Built-in monitoring and firewalls for protection.
Preparing To Access A Droplet
To access a DigitalOcean Droplet, begin by logging into your account. Then, navigate to the Droplets tab and select the Droplet you want to access. Finally, click on the Access button to open the console and start managing your Droplet effortlessly.
Prerequisites For Access
Before accessing a DigitalOcean Droplet, there are a few prerequisites that need to be met. First, you must have a DigitalOcean account with a Droplet created. Second, you need to have an SSH client installed on your local machine. Finally, you need to know the IP address of your Droplet, which can be found in the DigitalOcean control panel.Security Considerations
When accessing your Droplet, it is important to consider security. One way to increase security is to disable password authentication and use SSH keys instead. This involves generating a public and private key pair, adding the public key to your Droplet, and using the private key to authenticate when accessing the Droplet. Additionally, you should consider using a firewall to restrict access to certain ports and IP addresses.Accessing Your Droplet
To access your Droplet, open your SSH client and enter the IP address of your Droplet as the host. You will then be prompted to authenticate with a username and password or an SSH key. Once authenticated, you will have access to your Droplet’s command line interface. By following these simple steps, you can prepare to access your DigitalOcean Droplet with increased security and ease. Remember to always consider security when accessing your Droplet and to use an SSH client for authentication.Using Ssh For Droplet Access
Accessing your DigitalOcean droplet via SSH provides a secure way to manage your server. Below, we’ll walk through the essential steps of generating SSH keys and connecting to your droplet using SSH.
Generating Ssh Keys
Follow these simple steps to generate SSH keys for secure access to your DigitalOcean droplet:
- Open your terminal or command prompt.
- Enter the command
ssh-keygen -t rsa -b 4096 -C "[email protected]". - Specify the file in which to save the key, or press Enter to save the key in the default location.
- Enter a secure passphrase when prompted. (Optional but recommended)
Connecting Via Ssh
Once you have generated your SSH keys, follow these steps to connect to your droplet:
- Locate your public key, usually named
id_rsa.pub. - Copy the contents of the public key to your droplet’s
~/.ssh/authorized_keysfile using the commandssh-copy-id username@droplet_ip. - Open a new terminal window and enter
ssh username@droplet_ipto connect to your droplet.
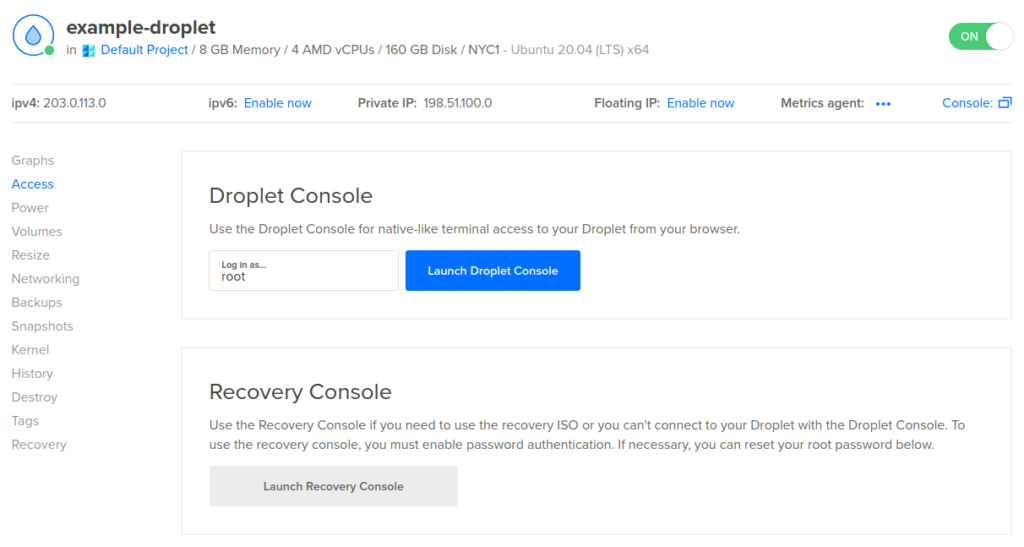
Accessing Droplets With The Digitalocean Control Panel
When it comes to accessing your DigitalOcean Droplet, the DigitalOcean Control Panel provides an easy-to-use interface to manage your virtual servers. Here’s a step-by-step guide on how to access your Droplets using the Control Panel.
Navigating The Control Panel
The first step is to log in to your DigitalOcean account and navigate to the Control Panel. Once you’re on the Control Panel, you’ll see a list of all your Droplets. Click on the Droplet you want to access, and you’ll be taken to the Droplet’s management page.
Launching The Console
Once you’re on the Droplet’s management page, you’ll see several tabs. Click on the “Access” tab, and you’ll see the “Console Access” section. Here, you can launch the console by clicking on the “Launch Console” button.
The console is a web-based interface that allows you to interact with your Droplet as if you were sitting in front of it. You can use the console to perform tasks like installing software, configuring services, and troubleshooting issues.
Note that the console requires a web browser with JavaScript enabled, so make sure you have a compatible browser before launching the console.
Once you’ve launched the console, you’ll be prompted to enter your Droplet’s root password. After entering the password, you’ll be logged in to your Droplet and can start working on it.
That’s it! With the DigitalOcean Control Panel, accessing your Droplets is quick and easy.
Remote Desktop Protocols (rdp)
Remote Desktop Protocols (RDP) allow you to access your DigitalOcean Droplet remotely, providing a convenient way to manage your server. In this blog post, we will guide you through the process of setting up RDP on a Droplet and connecting with RDP clients.
Setting Up Rdp On A Droplet
Setting up RDP on a DigitalOcean Droplet is a straightforward process. Follow these steps:
- First, ensure that your Droplet is running a Windows operating system, as RDP is primarily used for Windows-based servers.
- Login to your Droplet using SSH or the DigitalOcean console.
- Once logged in, open the command prompt and enter the following command to install the RDP server:
sudo apt-get install xrdp
Wait for the installation to complete. Once finished, you can proceed to connect with RDP clients.
Connecting With Rdp Clients
To connect with your Droplet using RDP, follow these steps:
- Launch your preferred RDP client software on your local machine.
- Enter the IP address of your Droplet in the appropriate field.
- Provide your login credentials, including the username and password associated with your Droplet.
- Click on the “Connect” button to establish the RDP connection.
Once the connection is established, you will have full access to your Droplet’s desktop environment, allowing you to manage your server as if you were physically present.
With RDP, you can conveniently perform tasks such as installing software, configuring settings, and troubleshooting issues on your Droplet, all from the comfort of your own device.
Now that you know how to set up RDP on a DigitalOcean Droplet and connect using RDP clients, you can easily manage your server remotely with ease and efficiency.
Credit: docs.digitalocean.com
Third-party Tools For Droplet Management
When managing DigitalOcean droplets, third-party tools can greatly enhance the access and functionality of your infrastructure. By leveraging these tools, users can simplify the management process, monitor performance, and enhance security. Let’s explore some popular third-party tools for enhanced droplet access and how to integrate them seamlessly with DigitalOcean.
Popular Tools For Enhanced Access
Several third-party tools can be used to enhance the management and access of DigitalOcean droplets. These tools provide additional functionalities and user-friendly interfaces, making it easier to handle various aspects of droplet management.
- ServerPilot: An intuitive control panel that simplifies the deployment and management of PHP applications on DigitalOcean droplets.
- Cockpit: A web-based server manager that allows for easy administration of Linux servers, including DigitalOcean droplets, through a user-friendly interface.
- RunCloud: Offers a simple yet powerful interface for managing and monitoring multiple cloud servers, including DigitalOcean droplets, with features such as server optimization and security management.
Integrating Tools With Digitalocean
Integrating third-party tools with DigitalOcean is a seamless process that can be achieved through the use of APIs and integrations. DigitalOcean provides robust API documentation, enabling users to connect and manage their droplets using these external tools.
By integrating these tools with DigitalOcean, users can streamline the management process, automate tasks, and gain deeper insights into their droplet performance and security.
Automating Access With Api And Cli
Automating access to your DigitalOcean droplet is made simple through API and CLI integration. By leveraging these tools, you can efficiently manage and interact with your droplet, streamlining processes and enhancing overall productivity. Accessing your droplet becomes seamless and hassle-free with the power of automation.
Using Digitalocean Api
Automating access with API and CLI streamlines server management.
- API allows programmatic interaction with DigitalOcean resources.
- Create, retrieve, and manage Droplets programmatically.
- Automate complex tasks efficiently through API endpoints.
Leveraging Doctl Command-line Tool
Enhance server access through the doctl command-line tool.
- Manage Droplets, volumes, and more from the command line.
- Install doctl and authenticate with your DigitalOcean account.
- Execute commands to automate tasks and streamline access.

Credit: bobcares.com
Troubleshooting Common Access Issues
Encountering access issues while trying to connect to your DigitalOcean Droplet can be frustrating. Below are some common problems you may face and how to resolve them:
Dealing With Ssh Problems
- Check SSH port settings.
- Verify SSH key permissions.
- Ensure the SSH service is running.
Resolving Console Access Errors
- Confirm the console URL is correct.
- Check network connectivity.
- Restart the Droplet if issues persist.
Best Practices For Droplet Security
Ensuring the security of your DigitalOcean Droplet is crucial in safeguarding your data and operations. By following these best practices for Droplet security, you can mitigate potential risks and enhance the protection of your virtual server.
Regular Updates And Patches
- Frequently update software to prevent vulnerabilities.
- Apply security patches promptly after release.
Implementing A Firewall
- Configure a firewall to control incoming and outgoing traffic.
- Restrict access to specific ports based on your needs.
Credit: www.digitalocean.com
Frequently Asked Questions
How Do I Access A Digitalocean Droplet?
To access a DigitalOcean droplet, follow these steps: 1. Log in to your DigitalOcean account. 2. Navigate to the Droplets section. 3. Find the droplet you want to access and click on it. 4. Copy the droplet’s IP address. 5.
Use an SSH client to connect to the droplet using the IP address.
How Do I Open The Droplet Console?
To open the droplet console, follow these steps: 1. Log in to your DigitalOcean account. 2. Click on the ‘Droplets’ tab. 3. Select the droplet you want to access. 4. Click on ‘Access’ and then ‘Launch Console’. 5. Enter your login credentials to access the console.
How To Access Droplet Files?
To access droplet files, use an FTP client or the command line interface. Connect to your droplet using the IP address, username, and password provided. Once connected, you can navigate and transfer files as needed.
How To Use Digitalocean Droplets?
To use DigitalOcean droplets, first create an account and choose a plan. Then select the operating system and configure the droplet settings. Access the droplet via SSH or a web-based console. Install and configure software as needed, and manage the droplet through the DigitalOcean control panel.
Conclusion
Accessing your DigitalOcean droplet is an essential skill for managing your cloud server. By following the steps outlined in this guide, you can securely connect to your droplet and take full advantage of its capabilities. With these insights, you can confidently navigate your way through the world of cloud computing.


