To install Eclipse in Ubuntu DigitalOcean, follow these steps: First, open the terminal and run the command “sudo apt update” to update the package list. Next, install Java Development Kit (JDK) by running “sudo apt install default-jdk”.
Then, download Eclipse by visiting the official website and selecting the appropriate package for Linux. Once downloaded, extract the package and move it to the desired location. Finally, create a desktop shortcut for Eclipse by creating a new file with the extension “.
desktop” in the /usr/share/applications directory and adding the necessary information.
Credit: www.digitalocean.com
Introduction To Eclipse On Ubuntu
To install Eclipse on Ubuntu DigitalOcean, you can follow a few simple steps. First, ensure that Java is installed on your system. Then, download and extract Eclipse. After that, you can create a desktop entry for easy access. Finally, you can launch Eclipse and start using it for your development projects.
Benefits Of Eclipse Ide
Installing Eclipse in Ubuntu DigitalOcean can enhance your coding experience. It offers powerful features and customization options.Why Choose Digitalocean For Eclipse
DigitalOcean provides a reliable and scalable platform for running Eclipse.
Credit: www.digitalocean.com
Prerequisites For Installing Eclipse
To install Eclipse in Ubuntu DigitalOcean, there are a few prerequisites you need to consider. These include having Java Development Kit (JDK) installed, ensuring your system meets the minimum requirements, and having administrative privileges. Following these steps will help you successfully install Eclipse on your Ubuntu DigitalOcean server.
System Requirements
Before installing Eclipse on Ubuntu DigitalOcean, ensure your system meets the following requirements:- Ubuntu 18.04 or higher
- Minimum 2 GB RAM
- Intel or AMD processor with 64-bit support
Setting Up A Digitalocean Droplet
To install Eclipse on Ubuntu DigitalOcean, you need to set up a DigitalOcean droplet. Follow the steps below:- Create a DigitalOcean account and log in.
- Select “Create” and then “Droplets”.
- Select Ubuntu 18.04 or higher as the distribution.
- Choose a plan that meets your requirements and select a data center region.
- Select “Create” to launch the droplet.
Updating Ubuntu System
Before installing Eclipse on Ubuntu, it’s crucial to ensure that your system is up to date. This will help prevent compatibility issues and ensure a smooth installation process.
Command Line Update
To update your Ubuntu system using the command line, follow these simple steps:
- Open a terminal by pressing
Ctrl + Alt + T. - Enter the following command to update the package lists:
sudo apt update- After the update process is complete, upgrade the installed packages by entering the following command:
sudo apt upgradeEnsuring System Compatibility
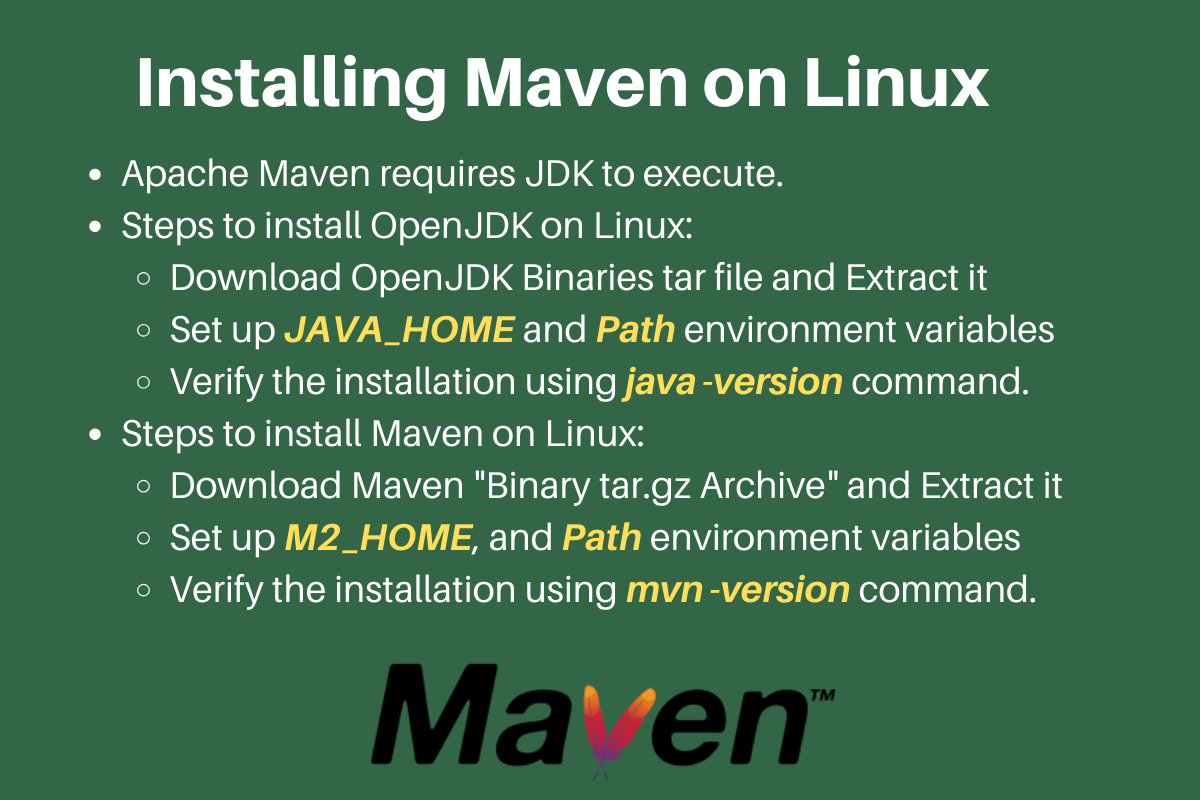
It’s important to ensure that your system meets the necessary requirements for running Eclipse. This includes having the appropriate Java Development Kit (JDK) version installed. You can check your Java version by using the following command:
java -versionIf Java is not installed or an older version is present, it’s recommended to install the latest OpenJDK version using the following command:
sudo apt install default-jdkInstalling Java Development Kit
To install Eclipse in Ubuntu Digitalocean, you need to install Java Development Kit first. To do so, open the terminal and execute the commands for installing JDK. Once installed, you can proceed with installing Eclipse.
Java Development Kit (JDK) is an essential requirement for running Eclipse on Ubuntu DigitalOcean. Without the JDK, Eclipse won’t function correctly. Hence, you need to install the JDK first before proceeding with the Eclipse installation. This section will guide you on how to install the JDK on Ubuntu DigitalOcean.Choosing The Right Jdk Version
Before downloading the JDK, it’s crucial to ensure that you choose the appropriate version that suits your Ubuntu DigitalOcean version. For instance, if you’re using Ubuntu 18.04 LTS, you should download the corresponding JDK version. Here’s a table showing the recommended JDK versions for various Ubuntu DigitalOcean versions:| Ubuntu DigitalOcean Version | Recommended JDK Version |
|---|---|
| 16.04 LTS | OpenJDK 8 |
| 18.04 LTS | OpenJDK 8 or OpenJDK 11 |
| 20.04 LTS | OpenJDK 11 or OpenJDK 13 |
Jdk Installation Steps
Once you have identified the appropriate JDK version, you can proceed with the installation process. Follow these steps to install the JDK on Ubuntu DigitalOcean:- Open the terminal by pressing
Ctrl + Alt + T. - Type the following command to update your Ubuntu package list:
sudo apt update - Type the following command to install the JDK:
sudo apt install default-jdk - Verify that the JDK has been correctly installed by typing:
java -version - If the installation was successful, you should see the following output:
openjdk version "x.xx.x_xxx"

  OpenJDK Runtime Environment (build x.xx.x_xxx)

  OpenJDK XX-Bit Server VM (build x.xx.x_xxx, mixed mode, sharing)
Downloading Eclipse
To install Eclipse in Ubuntu on DigitalOcean, begin by downloading the Eclipse installer from the official website. Next, extract the downloaded file and run the installer, following the on-screen prompts to complete the installation process.
Selecting The Eclipse Package
Before downloading Eclipse, it is important to select the appropriate package that suits your needs. Eclipse offers different packages tailored for different programming languages and development environments. You can choose from options such as Eclipse IDE for Java Developers, Eclipse IDE for C/C++ Developers, Eclipse IDE for PHP Developers, and many more.
To ensure you download the correct package, consider the programming language you will be working with and the specific features you require. This will help you make an informed decision and ensure you have the necessary tools for your development tasks.
Using Wget To Download Eclipse
Once you have determined the appropriate Eclipse package, you can proceed to download it using the wget command in Ubuntu. Wget is a command-line utility that allows you to retrieve files from the internet. Here’s how you can use wget to download Eclipse:
- Open your terminal in Ubuntu by pressing
Ctrl+Alt+Tor by searching for “Terminal” in the application launcher. - Navigate to the directory where you want to save the Eclipse installation file. You can use the
cdcommand to change directories. - Run the following command, replacing
URLwith the direct download link of the Eclipse package you selected:
wget URL
For example, if you want to download Eclipse IDE for Java Developers, you can find the direct download link on the Eclipse website and use it in the wget command. This will initiate the download process, and you will see the progress displayed in your terminal.
Once the download is complete, you will have the Eclipse installation file saved in the directory you specified. You can now proceed to install Eclipse on your Ubuntu DigitalOcean droplet and start using it for your programming projects.

Credit: www.digitalocean.com
Installing Eclipse Ide
Installing Eclipse IDE on Ubuntu DigitalOcean is a straightforward process that enables you to harness the powerful capabilities of Eclipse for your development projects. In this guide, we will walk through the steps to install Eclipse in Ubuntu on your DigitalOcean droplet.
Unpacking The Eclipse Archive
After downloading the Eclipse IDE package from the official website, navigate to the directory where the archive is located. Use the following command in the terminal to unpack the archive:
tar -zxvf eclipse-package-name.tar.gzSetting Up The Execution Path
Once the Eclipse archive is unpacked, it’s essential to set up the execution path. Open the terminal and navigate to the Eclipse installation directory. Then, create a symbolic link to the Eclipse executable file using the command:
sudo ln -s /path/to/eclipse/eclipse /usr/local/bin/eclipse
Configuring Eclipse
When it comes to configuring Eclipse in Ubuntu on DigitalOcean, setting up the workspace and optimizing performance are key steps to enhance your development environment.
Workspace Setup
Create a new workspace directory in Eclipse to organize your projects efficiently.
Performance Optimization Tips
Maximize Eclipse performance by allocating more memory in the eclipse.ini file.
Finalizing The Installation
Creating A Desktop Shortcut
1. Right-click on the desktop and select “Create a new launcher here.”
2. Enter the name as “Eclipse” and command as the path to the Eclipse executable.
Starting Eclipse For The First Time
- 1. Open a terminal window using Ctrl + Alt + T.
- 2. Navigate to the Eclipse installation directory.
- 3. Enter “./eclipse” to start Eclipse for the first time.
Ensure the installation is complete and test by running a sample project.
Troubleshooting Common Installation Issues
Encountering problems during the installation of Eclipse on Ubuntu DigitalOcean is a common occurrence. Understanding how to troubleshoot these issues is essential for a smooth setup process.
Resolving Dependency Problems
Dependencies are crucial for Eclipse to function correctly. To fix dependency errors:
- Check if all required packages are installed.
- Update the package repository using the command:
sudo apt-get update. - Install missing dependencies with:
sudo apt-get install [dependency-name].
Fixing Launch Errors
If Eclipse fails to launch, follow these steps:
- Ensure Java is installed and configured properly.
- Check Eclipse installation directory for errors.
- Run Eclipse from the terminal to view error messages:
eclipse -consoleLog.
Best Practices For Eclipse On Digitalocean
Learn how to install Eclipse in Ubuntu DigitalOcean with these best practices. Follow these guidelines to ensure a smooth installation process and optimize your Eclipse experience.
Regular Updates And Maintenance
Regular updates ensure optimal performance and security.
Perform system updates using sudo apt update && sudo apt upgrade.
- Set up automatic updates for hassle-free maintenance.
- Check for Eclipse updates within the IDE.
Securing Your Development Environment
Protect your system and code from potential threats.
- Enable firewall with
sudo ufw enable. - Restrict SSH access to trusted IP addresses.
| Key Point | Action |
|---|---|
| Secure Eclipse plugins | Install plugins from trusted sources only. |
| Backup projects | Regularly back up code to prevent data loss. |
Frequently Asked Questions
How To Install The Eclipse In Ubuntu?
Download Eclipse from the official website. Extract the downloaded file. Run Eclipse from the extracted folder. That’s it!
How To Install Eclipse Theia In Ubuntu?
To install Eclipse Theia in Ubuntu, follow these steps: 1. Open the Terminal. 2. Run the command “sudo apt update” to update the package lists. 3. Install Node. js by running “sudo apt install nodejs”. 4. Install npm (Node Package Manager) with “sudo apt install npm”.
5. Finally, install Theia by running “sudo npm install -g yarn theia”. That’s it! Eclipse Theia is now installed on your Ubuntu system.
How Do I Install Eclipse In Ubuntu Digitalocean?
To install Eclipse in Ubuntu on DigitalOcean, follow these steps:
1. Connect to your DigitalOcean Droplet via SSH. 2. Update the package lists using `sudo apt update`. 3. Install default JDK using `sudo apt install default-jdk`. 4. Download Eclipse using `wget` command. 5. Extract the downloaded file using `tar -xf` command. 6. Launch Eclipse using the terminal command `./eclipse`.
What Are The System Requirements For Installing Eclipse In Ubuntu Digitalocean?
To install Eclipse in Ubuntu on DigitalOcean, your Droplet should meet the following requirements:
1. Ubuntu version 16.04 or higher. 2. At least 2GB of RAM. 3. Sufficient disk space for Eclipse and your projects. 4. A stable internet connection for downloading Eclipse and its dependencies.
Conclusion
Installing Eclipse on Ubuntu DigitalOcean is a straightforward process. By following the step-by-step guide provided, you can seamlessly set up Eclipse for your development projects. With Eclipse, you’ll have a powerful integrated development environment at your fingertips, enhancing your productivity and efficiency.
Embrace the potential of Eclipse on Ubuntu DigitalOcean today.