
To point a domain to DigitalOcean, you need to update the domain’s DNS records with the appropriate settings provided by DigitalOcean. This will ensure that the domain properly directs traffic to your DigitalOcean droplets or services.
When it comes to hosting your website or applications on DigitalOcean, pointing your domain to the correct server is crucial. By correctly configuring your domain’s DNS records, you can ensure that visitors are directed to your DigitalOcean droplets or services.
In this blog post, we will guide you through the process of pointing your domain to DigitalOcean, ensuring that your website or application is up and running smoothly. We will cover the necessary steps and settings required to update your domain’s DNS records, allowing you to seamlessly connect your domain with your DigitalOcean hosting environment. So, let’s get started and point your domain to DigitalOcean!
Introduction To Domain Pointing
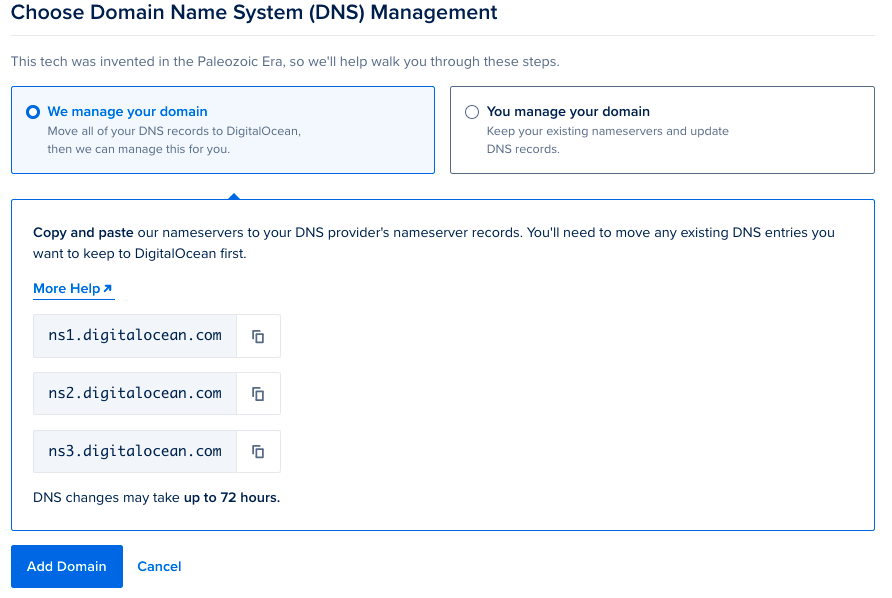
To point a domain to DigitalOcean, update the domain’s DNS settings with DigitalOcean’s nameservers. Access the domain registrar’s dashboard to input the new nameserver information provided by DigitalOcean. This action directs the domain to the correct server IP address.
What Is Domain Pointing?
Domain pointing is the process of connecting a domain name to a specific server, like DigitalOcean.Benefits Of Pointing Domain To Digitalocean
1. Improved website speed and performance. 2. Enhanced security features and control. 3. Customizable DNS settings for better management. Introduction to Domain Pointing: Domain pointing is the way to link a domain to a server. It’s crucial for website functionality. When you point your domain to DigitalOcean, you connect your domain name to the server where your website is hosted. This ensures that when someone types your domain into their browser, they are directed to the correct server to view your website content.What Is Domain Pointing?
Domain pointing connects a domain to a specific server like DigitalOcean.Benefits Of Pointing Domain To Digitalocean
Prerequisites Before You Begin
Before pointing your domain to DigitalOcean, ensure you have access to your domain registrar account. You’ll also need the IP address of your DigitalOcean server and the knowledge to update your domain’s DNS settings. These prerequisites are essential for a smooth setup process.
Before you can point your domain to DigitalOcean, there are a few prerequisites that you need to take care of. These prerequisites include registering your domain name and creating a DigitalOcean account. Let’s take a closer look at each of these steps.Registering Your Domain Name
The first step to pointing your domain to DigitalOcean is to register your domain name. This is the web address that people will use to access your website. There are many domain registrars available, but we recommend using a reputable one like GoDaddy or Namecheap. When you register your domain name, make sure to choose a name that is easy to remember and relevant to your website’s content. Also, make sure to choose a top-level domain (TLD) that is appropriate for your website’s purpose.Creating A Digitalocean Account
The next step is to create a DigitalOcean account. DigitalOcean is a cloud computing platform that allows you to host your website on their servers. To create an account, go to the DigitalOcean website and follow the sign-up process. Once you have created your account, you will need to create a droplet. A droplet is a virtual server that you can use to host your website. You can choose from a variety of droplet sizes and configurations, depending on your website’s needs. In conclusion, before you can point your domain to DigitalOcean, you need to register your domain name and create a DigitalOcean account. Once you have done this, you can create a droplet and start hosting your website.Understanding Dns Records
Understanding DNS Records is crucial when pointing a domain to DigitalOcean. DNS (Domain Name System) records are like a roadmap that directs traffic to the correct destination on the internet. It’s important to grasp the different types of DNS records and how they impact domain pointing.
Types Of Dns Records
DNS records come in various types, each serving a specific purpose. The most common types include:
- A (Address) Record
- CNAME (Canonical Name) Record
- MX (Mail Exchange) Record
- TXT (Text) Record
- NS (Name Server) Record
How Dns Records Affect Domain Pointing
DNS records play a crucial role in domain pointing. The A record, for instance, specifies the IP address associated with the domain, while the CNAME record maps a domain to another domain. MX records, on the other hand, are used for email routing.
Credit: docs.digitalocean.com
Setting Up Your Domain On Digitalocean
Setting up your domain on DigitalOcean is a simple process. Learn how to point your domain to DigitalOcean and get your website up and running in no time. Say goodbye to complicated configurations and hello to a smooth setup experience.
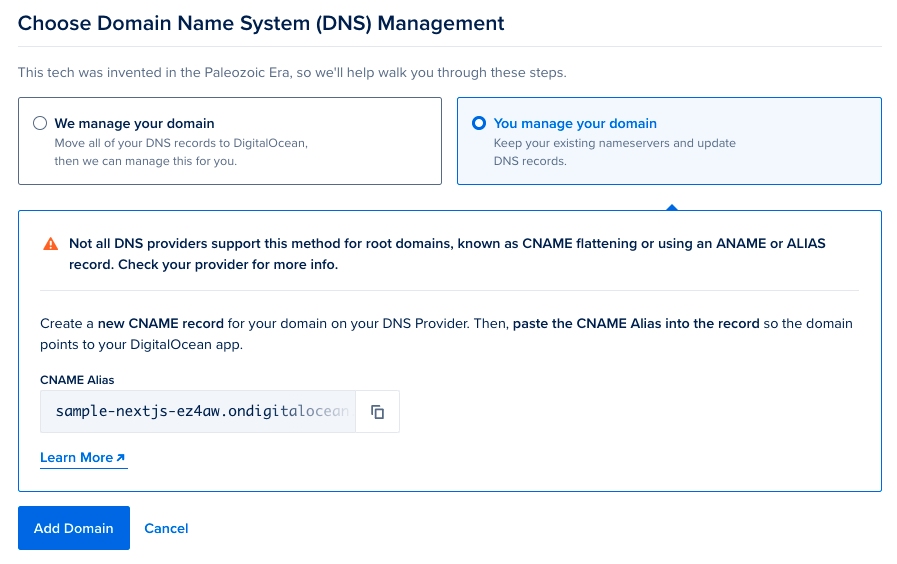
Adding A Domain To Your Digitalocean Project
To point your domain to DigitalOcean, the first step is to add your domain to your DigitalOcean project. This can be done through the DigitalOcean control panel. Simply navigate to the Networking section and select the Domains tab. From there, click the Add Domain button and enter your domain name.Navigating The Digitalocean Dns Interface
Once you have added your domain to your DigitalOcean project, the next step is to configure your domain’s DNS settings. This can be done by navigating to the Networking section and selecting the Domains tab. From there, click the name of the domain you wish to configure. In the DigitalOcean DNS interface, you can manage all aspects of your domain’s DNS settings. This includes adding and removing DNS records, configuring DNSSEC, and setting up domain forwarding. To add a new DNS record, simply click the Add Record button and enter the necessary information. This may include the record type, name, value, and TTL. It is important to note that changes to your DNS settings may take up to 48 hours to propagate across the internet. Therefore, it is recommended to make changes well in advance of any planned downtime or migration. With these simple steps, you can easily point your domain to DigitalOcean and begin taking advantage of their powerful cloud hosting services.Configuring Dns Records
Configuring DNS records is an essential step when pointing your domain to DigitalOcean. By properly setting up your DNS records, you ensure that your website, email, and other services function correctly. In this guide, we will walk you through the process of editing A records, setting up CNAME records, and managing MX records for email.
Editing A Records
Editing A records is necessary when you want to map your domain to the IP address of your DigitalOcean droplet. Follow these steps to configure your A records:
- Log in to your domain registrar’s control panel.
- Navigate to the DNS management section.
- Locate the A record for your domain and click on the edit button.
- Enter your droplet’s IP address in the appropriate field.
- Save the changes.
Setting Up Cname Records
Setting up CNAME records allows you to create aliases for your domain or subdomains. This is useful when you want to point multiple subdomains to different services. Here’s how to set up CNAME records:
- Access your domain registrar’s control panel.
- Navigate to the DNS management section.
- Find the CNAME record section and click on the add/edit button.
- Enter the subdomain or alias in the hostname field.
- Specify the target domain or IP address in the target field.
- Save the changes.
Managing Mx Records For Email
When it comes to email, managing MX records is crucial for ensuring proper delivery. Follow these steps to configure MX records:
- Login to your domain registrar’s control panel.
- Navigate to the DNS management section.
- Locate the MX record section and click on the add/edit button.
- Enter the priority and mail server details provided by your email service provider.
- Save the changes.
Propagation: Timing And Expectations
To point your domain to DigitalOcean, you need to set up DNS records and update nameservers. This process can take up to 24 hours for propagation, but typically happens much faster. Expect to see your website live within a day or two after completing the steps correctly.
What Is Dns Propagation?
How To Check Dns Propagation Status
Troubleshooting Common Issues
To troubleshoot common issues when pointing a domain to DigitalOcean, ensure that the DNS settings are correctly configured in the domain registrar’s control panel. Verify the DigitalOcean name servers are entered accurately, and then allow time for the changes to propagate.
Double-check the domain settings in the DigitalOcean dashboard to ensure they match the domain configuration.
Verifying Dns Configuration
Check the DNS settings to ensure accuracy.
- Confirm domain is pointed to DigitalOcean nameservers
- Verify correct A and CNAME records are set
- Ensure TTL values are appropriate
Resolving Propagation Delays
Propagation delays can occur after DNS changes.
- Check DNS propagation using online tools
- Flush DNS cache on local machine
- Be patient as propagation can take up to 48 hours
Best Practices For Domain Management
To point a domain to DigitalOcean, you can use either A records or CNAME records. It’s best practice to use A records for the root domain and CNAME records for subdomains. You’ll also need to update your DNS settings to point to DigitalOcean’s nameservers.
Regularly Updating Dns Records
Ensure DNS records are accurate and current.
- Check DNS settings frequently for errors.
- Update records promptly for changes.
Securing Your Domain With Ssl
Protect your domain with SSL certificate.
- Install SSL to encrypt data.
- Renew SSL before expiry date.
Conclusion: Your Domain Is Now Pointed
After pointing your domain to DigitalOcean successfully, your website is now live on the new server. Your domain is correctly directed, ensuring seamless online presence. Update DNS settings to finalize the process and enjoy your newly hosted website.
Final Checklist
Checklist before completing the domain pointing process: – Update DNS settings with DigitalOcean nameservers. – Ensure domain registrar changes are confirmed. – Validate SSL certificate installation.Next Steps After Pointing Your Domain
After pointing your domain to DigitalOcean, consider the following steps: – Set up email forwarding for domain emails. – Implement domain security measures. – Regularly monitor domain performance.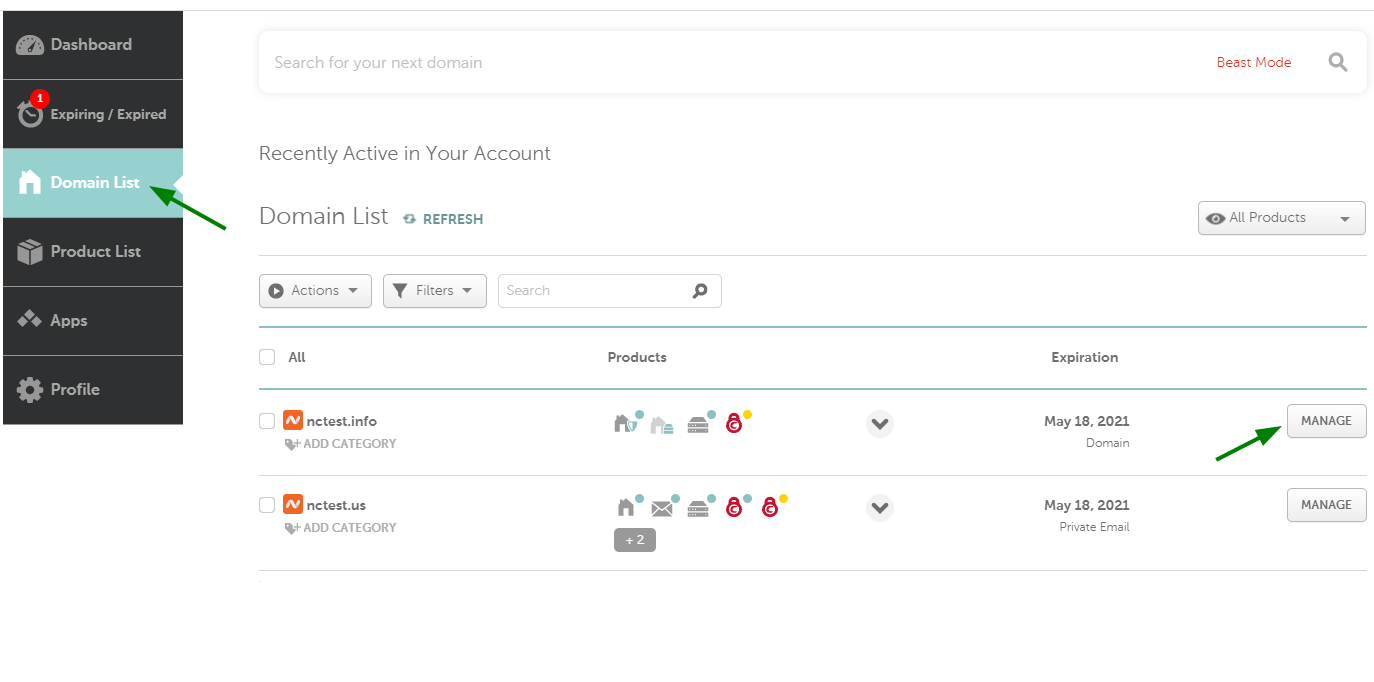
Credit: www.namecheap.com
Credit: m.youtube.com
Frequently Asked Questions
How Do You Point A Domain To Digitalocean?
To point a domain to DigitalOcean, follow these steps: 1. Log in to your domain registrar’s website. 2. Locate the DNS settings for your domain. 3. Add DigitalOcean’s nameservers to your domain’s DNS settings. 4. Save the changes and wait for DNS propagation.
5. Verify the domain is successfully pointed to DigitalOcean using tools like DNS lookup. That’s it! Your domain is now pointed to DigitalOcean.
How Do I Add An External Domain To Digitalocean?
To add an external domain to DigitalOcean, go to the Networking section and select Domains. Then, click “Add Domain” and enter the domain name. Next, set the DNS records with your domain registrar. Finally, point the domain to your DigitalOcean droplet IP address.
How Do I Point My Godaddy Domain To Digitalocean?
To point your GoDaddy domain to DigitalOcean, follow these steps: 1. Log in to your GoDaddy account. 2. Go to the DNS Management page for your domain. 3. Update the A record to your DigitalOcean server’s IP address. 4. Save the changes.
5. Wait for the DNS propagation, which can take up to 48 hours.
How To Map Domain Name To Ip Address In Digitalocean?
To map a domain name to an IP address in DigitalOcean: 1. Sign in to your DigitalOcean account. 2. Go to the Networking section and select Domains. 3. Click on the “Add Domain” button and enter your domain name. 4. Create an A record with your domain name and the IP address you want to map it to.
5. Save the changes, and your domain will be mapped to the specified IP address.
Conclusion
Pointing your domain to DigitalOcean is a crucial step in getting your website up and running. By following the steps outlined in this guide, you can effectively direct traffic to your DigitalOcean-hosted site. With a seamless domain setup, you’ll be well on your way to establishing a strong online presence.


