
To remove a project in DigitalOcean, you can do so by following a few simple steps. First, log in to your DigitalOcean account.
Then, navigate to the Projects page and select the project you want to remove. Finally, click on the “Settings” tab and scroll down to find the “Delete Project” button. Click on it and confirm the deletion when prompted. DigitalOcean is a popular cloud infrastructure provider that allows users to create and manage projects for their applications and websites.
However, there may come a time when you need to remove a project from your DigitalOcean account. Whether you no longer need the project or want to start fresh, deleting a project is a straightforward process. By following the steps mentioned above, you can easily remove a project in DigitalOcean and free up resources for other endeavors.
Introduction To Project Deletion In Digitalocean
Reasons For Removing A Project
Projects may be deleted due to inactivity or completion.
Removal helps declutter your workspace and improve organization.
Prerequisites Before Deletion
- Ensure all necessary data is backed up.
- Check for any pending tasks or ongoing processes.
Before deleting, review and confirm the action to avoid accidental removal.
Backup Strategies
To remove a project in DigitalOcean, navigate to the project settings, select the project you want to delete, and click on the “Delete Project” button. Confirm the action to permanently remove the project from your account. Remember to back up any important data before deletion.
Data Safety Measures
When it comes to removing a project in DigitalOcean, it’s essential to have a backup strategy in place to ensure the safety of your data. Before deleting any project, make sure to create a backup of all essential data to prevent any loss of information. DigitalOcean provides an excellent backup service that automatically takes snapshots of your Droplets, volumes, and Spaces, ensuring that your data is always safe.Exporting Project Data
Exporting your project data is another crucial step in the backup process. DigitalOcean allows you to export your data in various formats, including CSV, JSON, and XML. You can export data such as Droplet, Image, Volume, and Firewall information. Exporting your data ensures that you can access it even after deleting your project.Backup Frequency
It’s vital to establish a backup frequency that works for you. Regular backups will ensure that you always have access to the latest version of your data. DigitalOcean allows you to set up a backup schedule for your Droplets, volumes, and Spaces. You can choose to set up backups daily, weekly, or monthly, depending on your needs.Cloud-based Backup Solutions
Apart from DigitalOcean’s built-in backup service, you can also opt for cloud-based backup solutions like Amazon S3, Google Cloud Storage, or Backblaze B2. These services provide a reliable and secure backup solution, ensuring that your data is always safe and accessible. In conclusion, having a backup strategy is crucial when removing a project in DigitalOcean. Make sure to create regular backups of your essential data, export your project data, and choose a backup frequency that suits your needs. By following these backup strategies, you can ensure that your data is always safe, and you can access it even after deleting your project.Navigating The Digitalocean Dashboard
To remove a project in the DigitalOcean dashboard, first, navigate to the project you want to delete. Then, click on the project, go to the settings, and select the “Destroy Project” option. Confirm the deletion, and the project will be removed from your DigitalOcean account.
Navigating the DigitalOcean Dashboard Accessing Project Settings To remove a project in DigitalOcean, you first need to access the project settings. Here’s how to do it: 1. Log in to your DigitalOcean account. 2. On the left-hand side of the dashboard, click on the “Projects” tab. 3. Select the project from which you want to remove a resource. 4. Click on the project settings icon to access the settings page. Understanding the User Interface The DigitalOcean dashboard provides a user-friendly interface that allows you to manage your projects and resources efficiently. Here’s a breakdown of the key elements you need to understand: – Droplets: This section displays all the droplets associated with the project. – Kubernetes: Here, you can manage your Kubernetes clusters. – Databases: Access and manage your databases in this section. In the project settings, you can navigate through the different tabs to manage access control, tags, and other project-specific configurations. By following these steps and understanding the user interface, you can seamlessly navigate the DigitalOcean dashboard and remove a project when needed.Dismantling Resources Within The Project
To remove a project in DigitalOcean, you can utilize the dismantling resources within the platform. By following a few simple steps, you can easily remove the project and all associated resources, ensuring a smooth and efficient process.
Terminating Droplets And Services
When it comes to removing a project in DigitalOcean, it’s important to dismantle all the resources within the project to avoid any unnecessary charges. The first step in this process is to terminate any droplets that are currently running within the project. This can be done by navigating to the droplets section of the DigitalOcean dashboard and selecting the droplets that need to be removed. Once selected, click on the “destroy” button and confirm the action. This will immediately terminate the selected droplets, freeing up any associated resources and stopping any charges. In addition to terminating droplets, it’s also important to terminate any services that are no longer needed. This includes services such as load balancers, firewalls, and DNS records. These services can be removed by navigating to the appropriate section of the DigitalOcean dashboard and selecting the service that needs to be removed. Once selected, click on the “delete” button and confirm the action. This will immediately remove the selected service, freeing up any associated resources and stopping any charges.Removing Volumes And Databases
Another important step in dismantling resources within a project is to remove any volumes or databases that are no longer needed. This can be done by navigating to the volumes or databases section of the DigitalOcean dashboard and selecting the volume or database that needs to be removed. Once selected, click on the “destroy” button and confirm the action. This will immediately remove the selected volume or database, freeing up any associated resources and stopping any charges. It’s important to note that removing volumes or databases will permanently delete all data associated with them. Therefore, it’s important to make sure that any important data has been backed up before removing these resources. In conclusion, dismantling resources within a project is an important step in removing a project in DigitalOcean. By terminating droplets and services, as well as removing volumes and databases, you can ensure that all resources are properly removed and any associated charges are stopped.Transferring Resources To Another Project
When it comes to managing your projects on DigitalOcean, there may come a time when you need to remove a project and transfer its resources to another project. This can be a crucial step to ensure the continuity of your services without any disruption or downtime. In this blog post, we will guide you through the steps to move your resources to another project smoothly.
Steps To Move Resources
- First, log in to your DigitalOcean account and navigate to the Projects section.
- Select the project from which you want to remove resources.
- Click on the Settings tab within the project.
- Under the Resources section, you will find a list of all the resources associated with the project.
- Identify the resources you wish to transfer to another project.
- For each resource, click on the More option and select Move to Project.
- A dropdown menu will appear with a list of your other projects. Choose the destination project.
- Confirm the transfer by clicking on the Move button.
Ensuring Continuity Of Services
When transferring resources to another project, it is crucial to ensure the continuity of your services. Here are a few important points to consider:
- Review Dependencies: Before moving any resource, make sure to review any dependencies it may have on other resources within the current project. This will help you avoid any unexpected issues or disruptions.
- Test Connectivity: After the transfer, it is recommended to test the connectivity and functionality of the transferred resources within the new project. This will help ensure that your services are running smoothly.
- Update Configurations: If necessary, update any configurations or settings that might have changed during the transfer process. This includes updating DNS records, load balancer configurations, or any other relevant settings.
- Monitor Performance: Keep an eye on the performance of the transferred resources after the move. Monitor any metrics or logs to identify and address any potential issues promptly.
By following these steps and considering the continuity of your services, you can confidently remove a project in DigitalOcean and transfer its resources to another project without any disruption to your operations.
Credit: docs.digitalocean.com
Finalizing Project Removal
When it comes to finalizing the removal of a project in DigitalOcean, there are a few important steps to take. Once you have confirmed the deletion, it’s crucial to handle any remaining data properly. Let’s delve into the final steps for removing a project from DigitalOcean.
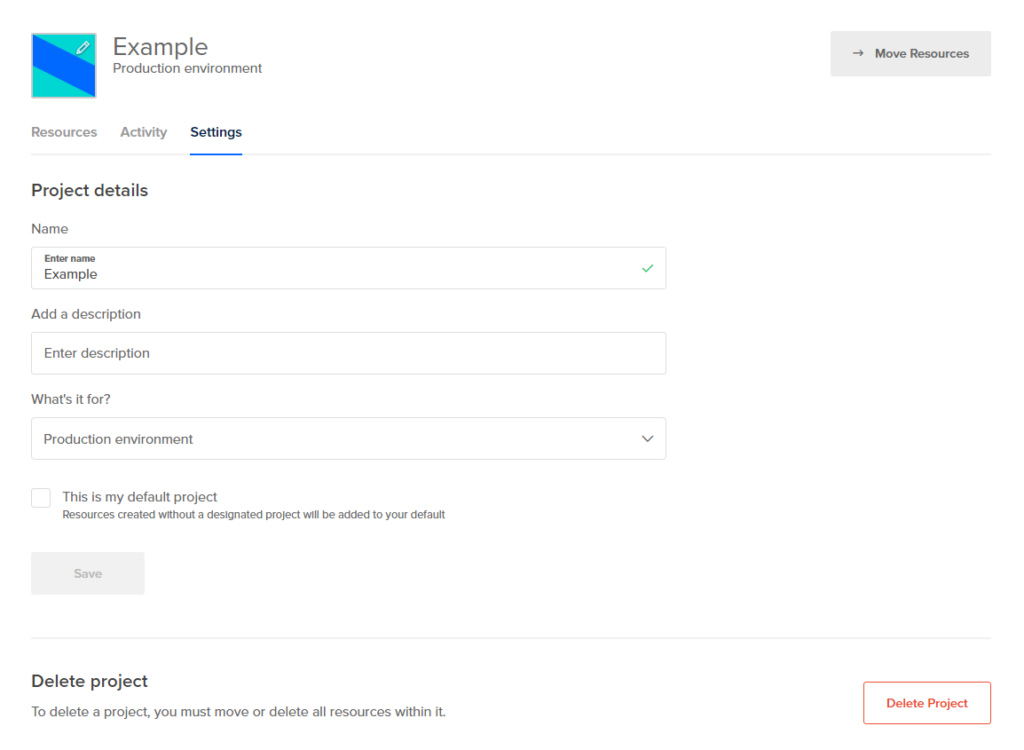
Confirming Deletion
Before proceeding, ensure that you have backed up any essential data from the project. Once confirmed, navigate to the project in the DigitalOcean dashboard. Then, click on the “Settings” tab and select “Destroy Project.” Confirm the deletion when prompted.
Handling Remaining Data
After confirming the deletion, it’s important to handle any remaining data in the project. This includes transferring any critical information to another location and ensuring that all relevant files are securely stored or deleted. Be thorough in this process to prevent any loss of important data.
Post-deletion Considerations
After removing a project in DigitalOcean, there are some important post-deletion considerations to keep in mind.
Monitoring For Orphaned Resources
Check for any orphaned resources left behind after the project deletion.
Updating Billing Information
Ensure to update billing details to avoid any unnecessary charges.

Credit: www.digitalocean.com
Troubleshooting Common Issues
When encountering problems while trying to remove a project in DigitalOcean, it’s important to address them promptly. Here are some common issues and how to resolve them:
Resolving Deletion Errors
If you receive an error message when attempting to delete a project, try the following steps:
- Check for any outstanding invoices or payments.
- Ensure all resources associated with the project are properly disconnected.
- Verify your permissions to delete the project.
Contacting Support For Assistance
If you are unable to resolve the deletion error on your own, don’t hesitate to reach out to DigitalOcean support. They can provide assistance and guide you through the process.
Support can be contacted via the online ticketing system or live chat for immediate help.
Alternatives To Project Deletion
Removing a project in DigitalOcean is irreversible, but there are alternatives to project deletion. You can choose to power off or destroy the resources within the project, or transfer them to another account.
Archiving Projects
Consider archiving projects instead of deleting them permanently.
Archiving allows you to keep project data for future reference.
Archived projects can be easily restored if needed in the future.
Transferring Ownership
If you no longer need a project, transfer ownership to someone else.
This ensures continuity and prevents data loss.
Transferring ownership is a secure way to hand over project responsibilities.
Credit: github.com
Frequently Asked Questions
How Do I Delete My Projects?
To delete your projects, go to the project list, click on the project, and select “Delete. ” Confirm the action to permanently remove the project.
How Do I Delete Files From Digital Ocean?
To delete files from Digital Ocean, log in to your account and navigate to the folder where the file is located. Select the file and click on the “Delete” option. You can also use the command line to delete files.
Use the “rm” command followed by the file name.
How Do You Delete A Droplet In Digital Ocean?
To delete a droplet in Digital Ocean, go to the control panel, select the droplet, click on “Destroy” and confirm.
How To Cancel Droplet Digital Ocean?
To cancel a droplet on DigitalOcean, follow these steps: 1. Log in to your DigitalOcean account. 2. Go to the Droplets page. 3. Select the droplet you want to cancel. 4. Click on the “Destroy” button. 5. Confirm the cancellation.
Conclusion
In a nutshell, removing a project in DigitalOcean is a straightforward process that involves a few simple steps. By following the guidelines provided you can efficiently delete a project and manage your resources effectively. With a clear understanding of the process, you can streamline your workflow and optimize your cloud infrastructure.


