To set up Kubernetes on DigitalOcean, follow these steps: First, create a Kubernetes cluster using the DigitalOcean Kubernetes service. Then, configure your local machine to connect to the cluster using the Kubernetes command-line tool (kubectl).
Setting up Kubernetes on DigitalOcean is a straightforward process that allows you to easily manage and scale containerized applications. DigitalOcean’s Kubernetes service simplifies the setup and management of Kubernetes clusters, making it accessible for both beginners and experienced users. With Kubernetes, you can efficiently deploy and manage your applications across multiple nodes, ensuring high availability and scalability.
In this guide, we will walk you through the steps to set up Kubernetes on DigitalOcean, enabling you to take advantage of its powerful features for your containerized applications. Let’s get started!
Credit: docs.digitalocean.com
Introduction To Kubernetes On Digitalocean
Setting up Kubernetes on DigitalOcean is made easy with the platform’s managed Kubernetes service. With just a few clicks, you can have a fully functioning Kubernetes cluster up and running, ready to deploy your containerized applications.
Benefits Of Using Kubernetes
Kubernetes simplifies container management and scalability. It enhances application reliability and resource optimization. Automates deployment, scaling, and monitoring efficiently.
Why Choose Digitalocean For Kubernetes
DigitalOcean offers a user-friendly Kubernetes setup. It provides a cost-effective and scalable solution. Highly reliable infrastructure and excellent customer support.
Prerequisites For Kubernetes Setup
Before setting up Kubernetes on DigitalOcean, ensure that you have a registered account with access to the DigitalOcean Control Panel. Additionally, you will need basic knowledge of Linux and containerization, and a working understanding of Docker.
Setting up Kubernetes on DigitalOcean requires some prerequisites that must be fulfilled before proceeding with the installation process. In this section, we will discuss the prerequisites for Kubernetes setup on DigitalOcean.Digitalocean Account Creation
To set up Kubernetes on DigitalOcean, you need to create an account on their platform. The process of creating an account is simple and straightforward. You can follow the below steps to create a DigitalOcean account:- Go to the DigitalOcean website
- Click on the “Sign Up” button located at the top right corner of the homepage
- Fill in the required details such as your name, email address, and password
- Verify your email address by clicking on the link sent to your email
- Once you have verified your email, your DigitalOcean account will be created
Required Tools And Software
Before proceeding with the Kubernetes setup, you need to ensure that you have the following tools and software:- Kubectl: The Kubernetes command-line tool, which allows you to deploy and manage applications on the Kubernetes cluster.
- Helm: A package manager for Kubernetes that allows you to install, upgrade, and manage applications on the Kubernetes cluster.
- DigitalOcean CLI: The DigitalOcean command-line tool, which allows you to interact with your DigitalOcean resources from the terminal.
- SSH Key: An SSH key is required to connect to the Kubernetes cluster. You can create an SSH key using the ssh-keygen command.
Creating Your Kubernetes Cluster
Accessing The Digitalocean Dashboard
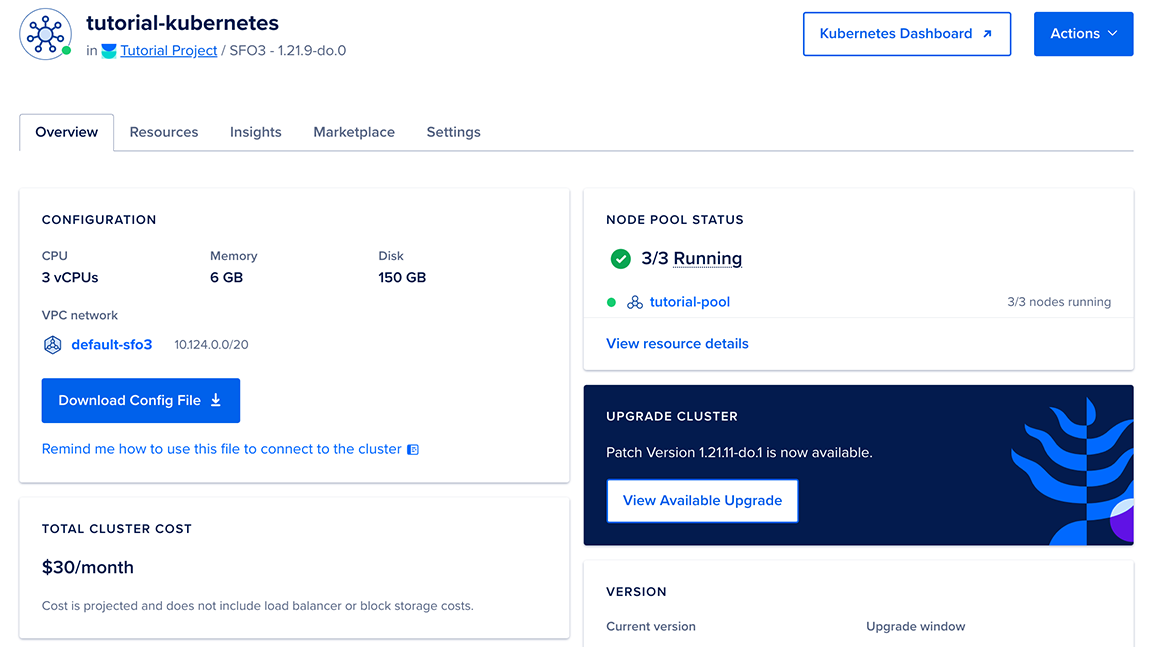
After logging into your DigitalOcean account, navigate to the Kubernetes section of the dashboard.
Click on the “Create Kubernetes Cluster” button to get started. You will be directed to the cluster creation page.
Configuring Your Kubernetes Cluster Settings
On the cluster creation page, start by selecting a data center region that is closest to your target audience for optimal performance.
Choose the Kubernetes version that best suits your requirements. Ensure to select the latest stable version for enhanced features and security.
Specify the node pool details, including the number of nodes, node size, and any additional tags or labels you may require.
Enter a name for your cluster, keeping it unique and easily identifiable within your infrastructure.
Review and confirm your settings before initiating the cluster creation process.

Credit: www.digitalocean.com
Node Pools And Droplets
When it comes to setting up Kubernetes on DigitalOcean, one of the most important decisions you’ll need to make is selecting the right droplet size and understanding node pools. This is because the size and number of your droplets will directly impact the performance and scalability of your Kubernetes cluster.
Understanding Node Pools
Node pools are groups of nodes within a Kubernetes cluster that share a common configuration. By creating multiple node pools, you can assign different resources and characteristics to different groups of nodes, allowing for greater flexibility and customization.
For example, you might create a node pool with larger droplets for applications that require more resources, and a separate node pool with smaller droplets for less resource-intensive applications.
Selecting The Right Droplet Size
When selecting droplet sizes for your Kubernetes cluster, it’s important to consider your application’s resource requirements and expected traffic levels. Choosing the wrong droplet size can lead to performance issues and unnecessary costs.
Here are some factors to consider when selecting droplet sizes:
- CPU and Memory: Your application’s CPU and memory requirements will determine the minimum droplet size you need.
- Expected Traffic: If you expect high traffic levels, you may need larger droplets to handle the load.
- Storage: If your application requires significant amounts of storage, you may need larger droplets with more storage capacity.
By carefully considering these factors and selecting the right droplet sizes, you can ensure that your Kubernetes cluster is optimized for performance and cost-efficiency.
Installing Kubernetes Command-line Tools
To set up Kubernetes on DigitalOcean, you need to first install the Kubernetes command-line tools. This can be done by downloading and configuring kubectl, the Kubernetes command-line interface, and other required tools on your local machine. Once installed, you can use kubectl to interact with your Kubernetes clusters.
Setting up Kubernetes command-line tools is an essential step in the process of configuring your Kubernetes cluster on DigitalOcean. These tools enable you to interact with and manage your Kubernetes environment efficiently. In this section, we will guide you through the process of setting up kubectl and verifying its installation.
Setting Up Kubectl
To begin, you need to install the kubectl command-line tool, which is used to communicate with your Kubernetes cluster. Follow the steps below to install kubectl:
- Open your terminal or command prompt.
- Execute the appropriate command based on your operating system:
| Operating System | Command |
|---|---|
| Linux | sudo apt-get install -y kubectl |
| MacOS | brew install kubectl |
| Windows (Chocolatey) | choco install kubernetes-cli |
After executing the appropriate command, wait for the installation process to complete. Once installed, you can proceed to verify the installation.
Verifying The Installation
To ensure that kubectl is successfully installed, follow the steps below:
- Open your terminal or command prompt.
- Type the following command and press Enter:
kubectl versionIf the installation was successful, you will see the version information for both the client and server components of kubectl.
Congratulations! You have now successfully installed kubectl and verified its installation. With this command-line tool, you are ready to interact with your Kubernetes cluster and manage your applications effectively.

Credit: www.digitalocean.com
Connecting To Your Cluster
Once your Kubernetes cluster is up and running on DigitalOcean, it’s time to connect to it and start managing your applications. This process involves retrieving the kubeconfig file and establishing a secure connection to your cluster.
Retrieving The Kubeconfig File
To retrieve the kubeconfig file for your cluster, you can use the DigitalOcean Control Panel or the doctl command-line tool. The kubeconfig file contains the necessary information to authenticate with your cluster and configure kubectl, the command-line tool for interacting with Kubernetes clusters.
Establishing A Secure Connection
After retrieving the kubeconfig file, you need to set up a secure connection to your Kubernetes cluster. This involves configuring kubectl to use the kubeconfig file and ensuring that the connection is secure and authenticated. Once the connection is established, you can begin managing your cluster and deploying applications with confidence.
Deploying Your First Application
Setting up Kubernetes on DigitalOcean for your first application deployment is straightforward. Follow clear steps to configure Kubernetes effortlessly. Leverage DigitalOcean’s user-friendly interface to streamline the process.
Creating A Deployment Yaml File
Create a YAML file for deployment configuration.
- Specify container image
- Define resource limits
- Set number of replicas
Managing Application Deployments
Scale, update, and monitor your application easily.
- Use kubectl commands for management
- Ensure high availability with replicas
- Monitor application health and performance
Scaling And Managing Workloads
When setting up Kubernetes on DigitalOcean, managing workloads efficiently is crucial. Let’s explore how you can scale applications up and down and monitor and log them effectively.
Scaling Applications Up And Down
Scaling applications efficiently is essential for optimal performance. Use Kubernetes Horizontal Pod Autoscaler to automatically adjust the number of running pods based on resource utilization.
Monitoring And Logging
Proper monitoring and logging are vital for ensuring the health of your Kubernetes cluster. Leverage tools like Prometheus for metrics monitoring and EFK stack for log aggregation.
Setting Up Persistent Storage
Setting up persistent storage for your Kubernetes cluster on DigitalOcean is a crucial step in ensuring reliable data storage. This guide will walk you through the process, providing clear instructions and best practices to help you get started with ease.
Persistent Volumes And Claims
Persistent volumes and claims are crucial in Kubernetes for storing data.
Choosing Storage Options
Various storage options can be used to meet different application requirements.
Securing Your Kubernetes Cluster
To secure your Kubernetes cluster, follow these steps to set up Kubernetes on DigitalOcean. Start by creating a DigitalOcean account and then use the DigitalOcean Kubernetes control plane to create a cluster. Finally, configure the cluster with proper access controls to ensure security.
Best Practices For Security
Implementing robust security measures is crucial for protecting your Kubernetes cluster from potential threats.
Enforce strong authentication mechanisms such as RBAC to control access.
Regularly update Kubernetes components to address security vulnerabilities.
Limit privileges to reduce the attack surface and enhance security.
Implementing Network Policies
Network policies define how pods communicate with each other and other network endpoints.
Use Calico or Cilium to enforce network segmentation and control traffic flow.
Restrict traffic between pods by defining ingress and egress rules.
Leverage network policies to prevent unauthorized access and data breaches.
Troubleshooting Common Issues
Setting up Kubernetes on DigitalOcean can sometimes come with its own set of challenges. In this section, we will address some common issues that you may encounter and provide guidance on how to troubleshoot them effectively.
Common Setup Errors
When setting up Kubernetes on DigitalOcean, it is not uncommon to encounter various errors that can hinder the smooth deployment of your cluster. Some common setup errors include misconfigured network settings, inadequate resource allocation, and compatibility issues with certain components.
Debugging Deployment Issues
Deploying applications on a Kubernetes cluster can sometimes lead to unexpected issues such as pod failures, service unavailability, or performance bottlenecks. It’s essential to have the right troubleshooting techniques in place to identify and resolve deployment issues promptly.
Conclusion And Next Steps
Discover how to easily set up Kubernetes on DigitalOcean with our step-by-step guide. Take your container orchestration to the next level and streamline your deployment process. Start leveraging the power of Kubernetes today for efficient and scalable application management.
Reviewing What We’ve Covered
In this blog post, we have explored the process of setting up Kubernetes on DigitalOcean. We started by discussing the benefits of using Kubernetes for container orchestration and why DigitalOcean is a popular choice for hosting Kubernetes clusters. We then walked through the step-by-step process of setting up a Kubernetes cluster on DigitalOcean, including creating a DigitalOcean account, provisioning Droplets, and configuring the cluster using kubectl.
We also covered important concepts such as pods, services, and deployments, explaining how they work together to manage and scale containerized applications. Additionally, we discussed the importance of configuring networking and security settings to ensure the smooth operation of the Kubernetes cluster.
Throughout the process, we provided clear instructions and examples to help you follow along easily. By now, you should have a fully functional Kubernetes cluster up and running on DigitalOcean.
Exploring Advanced Kubernetes Features
Now that you have successfully set up your Kubernetes cluster on DigitalOcean, it’s time to explore some advanced features and capabilities that Kubernetes offers. These features will allow you to further enhance the performance, scalability, and reliability of your containerized applications.
Some of the advanced Kubernetes features you can explore include:
- Horizontal Pod Autoscaling: This feature allows you to automatically scale the number of pods based on CPU utilization or custom metrics, ensuring optimal resource allocation.
- StatefulSets: StatefulSets enable the management of stateful applications in Kubernetes, providing stable network identities and persistent storage for each pod.
- DaemonSets: DaemonSets ensure that a specific pod runs on every node in the cluster, which is useful for running monitoring agents or other system-level tasks.
- Secrets and ConfigMaps: Kubernetes provides mechanisms for managing sensitive information and configuration data separately from application code, improving security and flexibility.
- Custom Resource Definitions (CRDs): CRDs allow you to extend the Kubernetes API and define custom resources, enabling you to manage complex applications and services.
By exploring these advanced features, you can take full advantage of Kubernetes and unleash its true potential for your containerized applications.
Now that you have completed the setup of Kubernetes on DigitalOcean and have an understanding of its advanced features, you are ready to deploy and manage your containerized applications with confidence and efficiency. Feel free to experiment, learn, and leverage the power of Kubernetes to optimize your application development and deployment workflows.
Frequently Asked Questions
Is Kubernetes Free On Digitalocean?
Yes, Kubernetes is free to use on DigitalOcean. You can easily set up and manage your Kubernetes clusters without any additional charges. Enjoy the benefits of container orchestration and scale your applications seamlessly on DigitalOcean’s platform.
What Is The Limit Of Kubernetes In Digitalocean?
The limit of Kubernetes in DigitalOcean depends on the specific plan you choose. The platform offers various Kubernetes plans with different resource limits to suit your needs.
How To Setup Kubernetes On Server?
To set up Kubernetes on a server, follow these steps: 1. Install Docker and Kubernetes packages. 2. Initialize the Kubernetes cluster. 3. Set up a network overlay. 4. Deploy a container runtime. 5. Join worker nodes to the cluster.
How To Create A K8s Cluster In Linux?
To create a K8S cluster in Linux, use tools like kubeadm for a simple setup process. Follow installation guides for Kubernetes.
Conclusion
To sum up, setting up Kubernetes on DigitalOcean is a powerful way to manage containerized applications. It offers scalability, flexibility, and ease of use for developers and businesses. With the right guidance and resources, you can harness the full potential of Kubernetes to streamline your deployment process and optimize your infrastructure.