
To set up SSH on DigitalOcean, follow these steps: generate an SSH key pair, add the public key to your DigitalOcean account, and connect to your Droplet using SSH. Setting up SSH (Secure Shell) on DigitalOcean allows you to securely access and manage your Droplets remotely.
SSH provides a secure and encrypted connection, making it a crucial component of server administration. By following a few simple steps, you can easily configure SSH on DigitalOcean and establish a secure remote connection. We will guide you through the process of setting up SSH, including generating an SSH key pair, adding the public key to your DigitalOcean account, and connecting to your Droplet using SSH.
By the end of this tutorial, you will have a secure SSH connection to your DigitalOcean Droplet, enabling you to manage your server efficiently.

Credit: www.digitalocean.com
Introduction To Ssh And Digitalocean
Discover how to easily set up SSH on DigitalOcean for secure server access. Effortlessly configure SSH keys for enhanced security.
Importance Of Secure Connections
Secure connections are crucial for protecting data.
Brief On Digitalocean’s Cloud Infrastructure
DigitalOcean offers scalable and reliable cloud solutions.
Prerequisites For Ssh Setup
Before setting up SSH on DigitalOcean, ensure you have a server running. Generate SSH keys using the ssh-keygen command. Copy the public key to your DigitalOcean account to complete the setup.
Creating A Digitalocean Account
Before setting up SSH on DigitalOcean, you need to create an account. Go to the DigitalOcean website and sign up for an account. Once you have created an account, you will need to create a droplet or use an existing one.Understanding Ssh Keys
SSH or Secure Shell is a protocol that allows you to securely connect to a server. To access your DigitalOcean droplet, you will need to use SSH. To do this, you will need to generate an SSH key pair. An SSH key pair consists of a public key and a private key. The public key is stored on the server, while the private key is kept on your local machine. Before setting up SSH on DigitalOcean, you need to make sure you have the following prerequisites:- A DigitalOcean account
- A droplet created or an existing one
- An SSH client installed on your local machine
- An SSH key pair generated
Generating Ssh Keys
When setting up SSH on DigitalOcean, the first step is to generate SSH keys. This process involves creating a public and private key pair that will allow secure access to your server.
Using Ssh-keygen On Linux And Mac
On Linux and Mac, you can use the ssh-keygen command in the terminal to generate SSH keys. Open the terminal and enter the following command:
ssh-keygen -t rsa -b 4096 -C "[email protected]"This command will prompt you to choose a location to save the keys and set a passphrase for added security. Once completed, you will have a public key file (id_rsa.pub) and a private key file (id_rsa) in the specified location.
Ssh Key Creation On Windows
On Windows, you can use the Git Bash terminal or the Windows Subsystem for Linux to generate SSH keys. Open the terminal and enter the same ssh-keygen command as used for Linux and Mac.
After generating the keys, you can use them to securely connect to your DigitalOcean server without the need for a password, enhancing the overall security of your system.
Adding Ssh Keys To Digitalocean
To set up SSH keys on DigitalOcean, follow these steps: generate a key pair on your local machine, copy the public key to your DigitalOcean account, and configure your SSH client to use the private key for authentication. This process ensures secure and convenient access to your DigitalOcean droplets without the need for passwords.
Adding SSH Keys to DigitalOcean is an essential step in securing your servers. SSH keys allow you to authenticate yourself with the server without requiring a password. DigitalOcean makes it easy to add SSH keys to your account, and in this guide, we will walk you through the process in three simple steps.Accessing The Security Settings
Before you can add an SSH key to your DigitalOcean account, you will need to log in to your account and navigate to the security settings. To access the security settings, follow these simple steps:- Log in to your DigitalOcean account.
- Click on the “Settings” tab in the main menu.
- Select “Security” from the drop-down menu.
- You will now be on the security settings page where you can manage your SSH keys.
Uploading The Public Key
Once you are on the security settings page, you can add a new SSH key to your account by following these steps:- Click on the “Add SSH Key” button.
- Enter a name for your SSH key in the “Name” field.
- Paste your public key into the “Public Key” field.
- Click on the “Add SSH Key” button to save your new key.
Creating A Droplet With Ssh Keys
Create a DigitalOcean droplet with SSH keys to ensure secure access to your server. By following the simple steps for setting up SSH keys, you can easily manage your server without the need for a password.
Creating a Droplet with SSH Keys When setting up your SSH DigitalOcean droplet, it is crucial to assign SSH keys to ensure secure access to your server. This process involves two main steps: selecting droplet specifications and assigning the SSH key to your droplet.Selecting Droplet Specifications
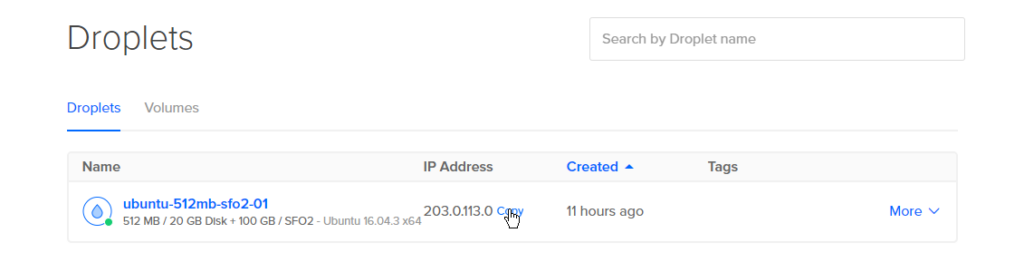
To begin, log in to your DigitalOcean account and navigate to the Droplets page. Click on the “Create” button and you will be presented with options to choose your droplet specifications. These specifications include selecting the desired operating system, droplet size, region, and any additional features you may require. It is important to consider the requirements of your project when selecting the operating system and droplet size. The operating system should be compatible with your applications and the droplet size should provide enough resources to handle your anticipated workload.Assigning The Ssh Key To Your Droplet
Once you have chosen your droplet specifications, the next step is to assign the SSH key to your droplet. SSH keys provide a secure way to authenticate and log in to your server without the need for a password. To assign an SSH key, scroll down to the “Authentication” section on the create droplet page. Here, you can select an existing SSH key from the dropdown menu or add a new SSH key by clicking on the “New SSH Key” button. If you choose to add a new SSH key, you will need to provide a name for the key and paste the public key into the designated field. It is important to ensure that the public key is accurate and properly formatted to avoid any authentication issues. By assigning an SSH key to your droplet, you can securely access your server using SSH without the need for a password. This provides an extra layer of security and convenience for managing your droplet. In conclusion, creating a droplet with SSH keys involves selecting the appropriate droplet specifications and assigning the SSH key to your server. By following these steps, you can ensure secure access to your DigitalOcean droplet and enhance the overall security of your server.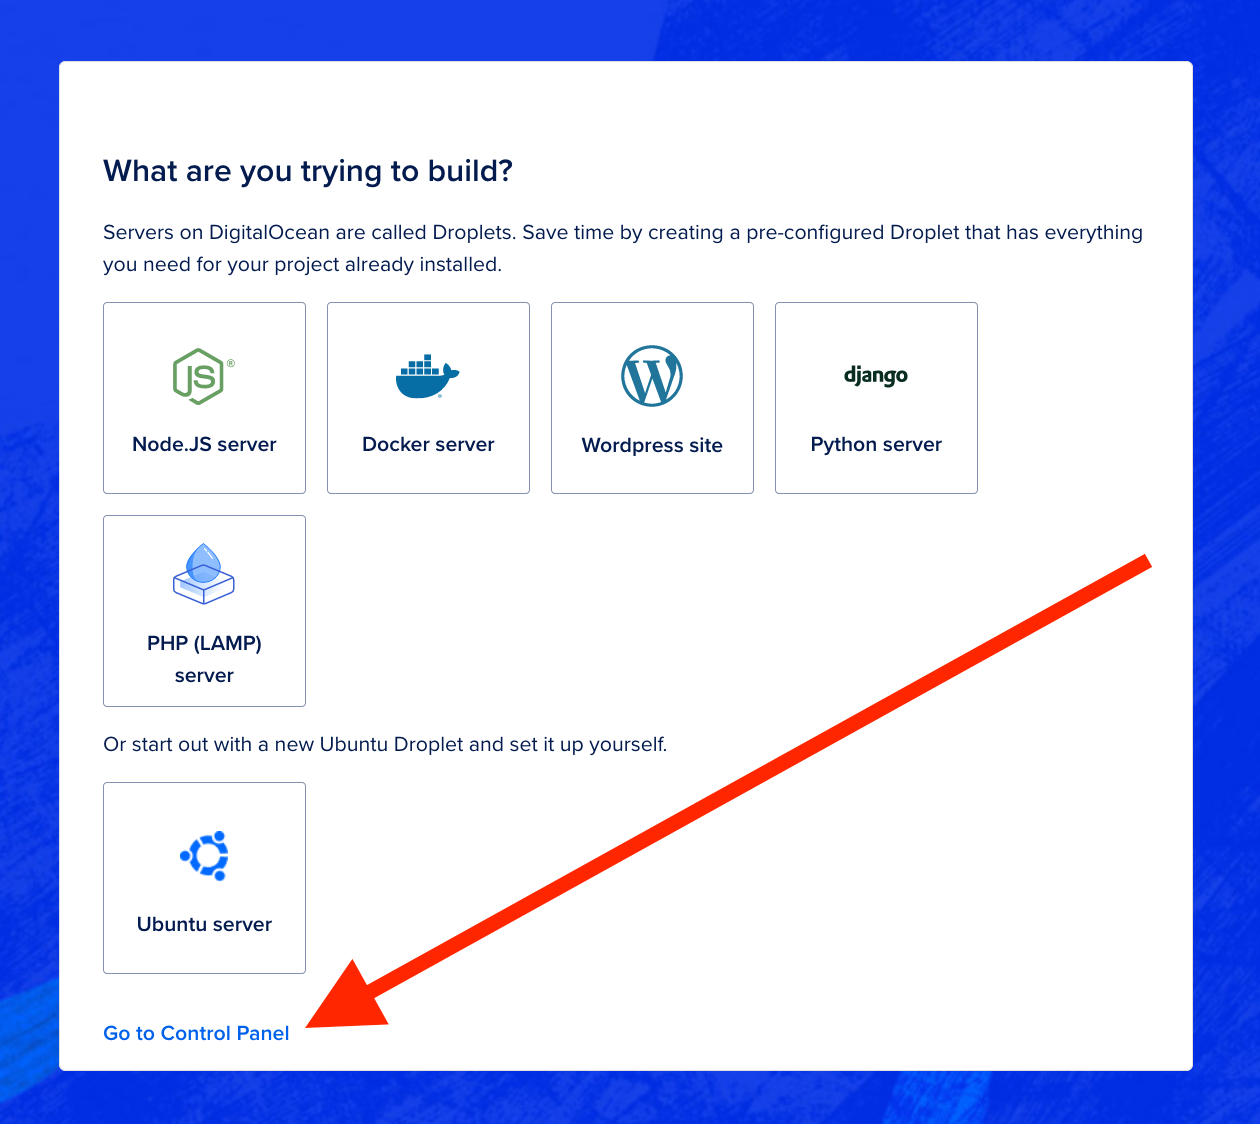
Credit: www.digitalocean.com
Connecting To Your Droplet Via Ssh
Connecting to your Droplet via SSH allows you to securely manage your server and execute commands remotely. In this section, we’ll cover how to establish an SSH connection to your DigitalOcean Droplet using various operating systems.
Ssh Access On Linux And Mac
To connect to your DigitalOcean Droplet via SSH on Linux or Mac, you can use the built-in terminal. Simply open the terminal and use the following command:
ssh username@your_server_ipReplace username with your username and your_server_ip with your server’s IP address. You will then be prompted to enter your password to complete the connection.
Using Putty For Ssh On Windows
For Windows users, PuTTY is a popular choice for SSH connections. After downloading and installing PuTTY, open the program and enter your server’s IP address and port number in the Host Name field. Ensure that the Connection type is set to SSH. Click Open and enter your username and password when prompted to establish the connection.
Enhancing Ssh Security
To enhance SSH security when setting up SSH on DigitalOcean, consider using key-based authentication instead of passwords. Additionally, you can change the default SSH port to reduce the risk of automated attacks. Harden the SSH configuration by disabling root login and limiting user access.
Regularly update SSH and monitor access logs for any suspicious activity.
Disabling Root Login
Logging in as root poses security risks. Create a new user with sudo privileges. Use this user to perform administrative tasks.
adduser mynewuserImplementing Fail2ban For Extra Protection
Fail2Ban blocks suspicious activities by monitoring login attempts. Configure it to ban IPs with too many failed login attempts.
sudo apt-get install fail2ban
Credit: www.digitalocean.com
Troubleshooting Common Ssh Issues
If you’re having trouble setting up SSH on DigitalOcean, there are some common issues you may encounter. These can include incorrect permissions, firewall settings, or key authentication problems. Troubleshooting these issues can help you get SSH up and running smoothly.
Dealing With Connection Timeouts
If experiencing connection timeouts, ensure server is running. Check network connectivity and firewall settings. Useping command to diagnose network issues.
Resolving Permission Denied Errors
Permission denied errors often due to incorrect file permissions. Usechmod command to adjust file permissions.
Verify correct user ownership of files and directories.
Best Practices For Ssh Management
Implementing best practices for SSH management is crucial for maintaining secure access to your DigitalOcean server. By following these guidelines, you can enhance the security of your SSH connections and protect your server from unauthorized access.
Regularly Updating Ssh Keys
Updating SSH keys helps prevent unauthorized access to your server.
Monitoring Ssh Access Logs
Regularly checking access logs can help you detect and respond to any suspicious activity.
Frequently Asked Questions
How To Setup Ssh Key Digitalocean?
To set up an SSH key on DigitalOcean, generate a key pair, add the public key to your account, and connect to your Droplet securely.
How To Setup Ssh Connection To Server?
To set up an SSH connection to a server, follow these steps: 1. Install an SSH client like OpenSSH. 2. Open the terminal or command prompt. 3. Type “ssh username@serverIP” and hit enter. 4. Enter your password when prompted. 5. You are now connected to the server via SSH.
How Do I Ssh Into My Droplet?
To SSH into your droplet, open your terminal and type “ssh root@your_droplet_ip”. Press enter and enter your password when prompted.
How To Setup Ssh Protocol?
To set up SSH protocol, follow these steps: 1. Install an SSH client on your device. 2. Generate SSH key pair using a keygen tool. 3. Copy the public key to the remote server’s authorized_keys file. 4. Configure the SSH server to allow key-based authentication.
5. Test the SSH connection to ensure it’s working correctly.
Conclusion
Setting up SSH on DigitalOcean is a crucial step for securing your server. By following the steps outlined in this guide, you can ensure a safe and efficient SSH connection. Remember to regularly update your SSH keys and monitor your server for any suspicious activity.
With these measures in place, you can enjoy a secure and reliable server environment.


